Establishing Perennial Pastures
On This Page
PLANNING A FORAGE STAND
SEEDING A FORAGE STAND
MAINTAINING A FORAGE STAND
In this module, you’ll explore best management practices for planning, seeding and maintaining a forage stand.
Planning a Forage Stand
key points
- For best results, start planning your forage stand 18 months in advance of seeding.
- Choose quality seed with a high germination rate and low weed seed count; certified if possible.
- Inoculate legume seed or use pre-inoculated seed.
- Weed control is important as options for control are significantly decreased once the stand is established.
- Review field history for possible herbicide residue issues.
- Take soil samples to assess fertility shortfalls and amend prior to seeding.
- Soil moisture is the most important factor for stand establishment. Spring seeding usually provides the most successful seeding window because of spring moisture.
- If frost seeding, soil temperatures must be 2°C or lower when seeding.
- If seeding in the summer, seeding must take place a minimum of 6-8 weeks in advance of a killing frost.
- The ideal seed bed is firm and weed-free with adequate soil moisture for germination.
- Alfalfa cannot be reseeded into an old alfalfa stand due to alfalfa autotoxicity. Wait a minimum of 12 months after termination of the previous alfalfa stand to reseed.
- Use the Establishing a Forage Stand worksheet to help you plan and prepare your new forage stand.
- When should I start planning my forage stand and what do I do in preparation for seeding?
-
A perennial forage stand is an investment, so planning for a successful stand should start at least 18 months before seeding. Planning starts with decision on which piece of land to seed and selecting a forage mix. Many factors should be taken into consideration when these decisions are made including intended use, frequency and type of harvest, soil and climate characteristics, land management and perennial weed pressures.
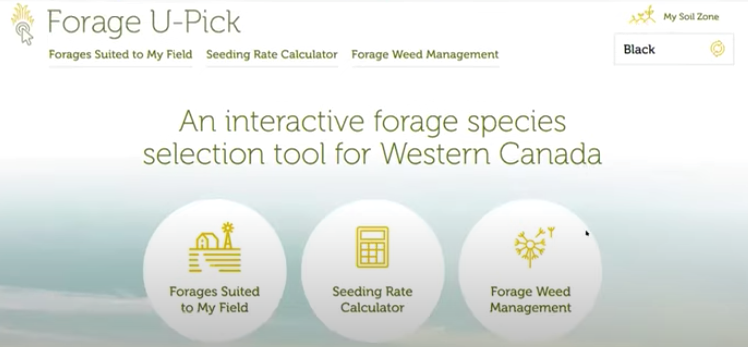
Forage U-Pick (click image to access) can be used to help determine the best forage species for your region, as well as compatible species mixtures, seeding rates, and basic weed identification and management.

More information on selecting forage species is also available in the Selecting Forage Species module.
During the planning phase, soil fertility and perennial weed populations should be monitored. A fertility plan should be developed to support seedling development and the overall production of the stand. A soil test will provide the information necessary to identify nutrient deficiencies that need to be amended. When making these decisions, take into account the species or mixture to be seeded. Pure legume and mixed legume and grass stands may have higher requirements for phosphorous, potassium and sulphur during establishment compared to pure grass stands depending on your soil type.
Commonly, fertilizer is applied before seeding by banding or broadcasting. Limited amounts of fertilizer can be side banded during seeding with a small amount of phosphate fertilizer placed with the seed.
More information on fertilization is available in the Managing Nutrients for Tame Pastures module.
Note: Growing a herbicide resistant crop the year before stand establishment can be a great tool for managing weed populations.
Control of perennial weeds, such as Canada thistle and foxtail barley, prior to seedling emergence is important. Herbicide options are limited following germination depending on the composition of the forage stand. A pre-emergence herbicide application to control annual weeds is important, especially in a no-till seeding scenario. Caution should be taken as some herbicides have residual effects on forage seedlings, especially native species and legumes. Read and follow the herbicide label for information on forage cropping restrictions prior to use. Keep in mind that herbicide residue from previous crops can also impact new forage stands.
If manure is used as a source of fertility, it is most commonly applied the year before establishment. This allows time in the spring for any viable weed seeds contained in the manure to germinate and be controlled chemically or mechanically prior to seeding the forage stand.
If the forage stand is being seeded into a field that has known weed pressures and the weeds are not managed prior to seeding, consider adapting the forage mix to compensate.
If the weed pressure is primarily broadleaf, seed only grasses and if the weed pressure is primarily grassy, only seed legumes and broadleaf forages. This will allow for more herbicide control options after the forage stand has germinated.
To optimize seedling germination, emergence and survival, seedbed preparation is key. Seed to soil contact is necessary for the germination of seeds. In a tilled seedbed, the soil must be firm and properly packed. If direct seeding into stubble, previous crop residue must be managed properly. While the stubble reduces evaporation at the soil surface, provides seedlings with some protection and prevents soil crusting, it can be more challenging to control seeding depth and provide good seed to soil contact. Chaff and straw management of the previous crop is important. Consider planting a crop with less residue, such as canola or peas, in a field that you are considering converting to a forage stand.
Straw should be finely chopped and evenly spread by the combine or baled and removed from the field, as excessive straw accumulation inhibits seedling emergence.
Use the Establishing a Forage Stand worksheet in the Toolkit to help you plan your new forage stand.
- How do I choose quality seed?
-
Certified Seed – seed that is legally guaranteed to meet varietal purity, germination and freedom from impurities standards as per the seed certificate of analysis. Third party inspections throughout the growing, cleaning and testing phases are required.
When purchasing seed, producers should request a seed certificate of analysis before a seed lot is chosen. The certificate provides a description of the seed, grade, germination rates, hard seed percentage (for legumes) and pure live seed (PLS) percentage. Common seed can be used, but it is recommended to invest in certified seed as varietal purity, germination rate, and low level of contaminants (i.e., weed seeds) are guaranteed. Check the seed certificate prior to purchase to ensure that there are no unwanted weed seeds that could cause costly problems after establishment. PLS can decrease in older seed, so a recent (within a year) certificate of analysis is better – ask for a seed analysis on the seed lot before purchase.
When seeding legumes, it is important to purchase pre-inoculated seed or inoculant to mix or place with the seed immediately prior to seeding. The inoculant contains the rhizobia bacteria necessary for the legume to fix nitrogen from the air. Inoculants are legume species specific and the correct one must be used in order for this symbiotic relationship to occur. When purchasing inoculant and pre-inoculated seed, it is prudent to check expiry dates and storage instructions on the label. When adding inoculant to seed, it is best to seed immediately as rhizobia mortality begins as soon as the inoculant is applied to the seed. Re-inoculate if the seed is not used within two days. Phosphate fertilizer can speed up the mortality rate of the rhizobia when mixed with the seed as a carrier.
Hard Seed – seed with a seed coat that is impervious to water and will not germinate, even though it is viable. High portions of hard seed are common in legumes. Over time, hard seed will de-harden in the soil. Hard seed can also be mechanically scarified to break the hard seed coat to improve germination.
Stored seed should be kept in a cool, dry place. Seed used more than one year from the purchase date should be re-tested for accurate germination.
- When is the best time to seed forages?
-
How do I measure my soil temperature? Place a thermometer in the soil at seeding depth. Take the soil temperature in the early morning and in the early evening. Average the two readings to obtain a daily temperature reading. Take readings in several points in the field as soil temperatures can vary greatly between locations.
Adequate soil moisture conditions are necessary for even germination and seedling establishment. Seeding in the spring takes advantage of the spring soil moisture and allows the seedlings ample time to develop throughout the summer months before a killing frost in the fall. Summer seeding can be successful but carries more risks to successful stand establishment. Summer often has variable precipitation, leading to inadequate soil moisture and insect pressure may be higher. Seedlings planted in summer may be less robust than spring planted seedlings, leading to higher winter mortality rates. In addition, high mid-summer temperatures are detrimental to young seedling survival and can decrease the establishment success of summer planted forage stands.
The later in the season the forage is seeded, the higher the risk that it will fail to establish. Sufficient leaf and root growth is required for winter survival, which is usually a minimum of six to eight weeks of growth prior to freeze up. Alfalfa should be at least the two-leaf growth stage and grasses at a minimum of two to three leaves to minimize overwintering losses. Winter survival of forage seedlings following late summer or early fall seeding is higher when seeded into stubble as compared to seeding into tilled soil because seeding into stubble conserves moisture and provides new seedlings with protection against the sun and wind.
Frost or dormant seeding is another viable option. Frost seeding can either occur in the fall or in the spring before the frost leaves the ground. When seeding in the fall, it is important to wait until the soil temperatures are at or below 2°C to prevent fall germination. In wet areas of the country, frost seeding can allow producers to take advantage of spring soil moisture without having to deal with fields that are too wet to support the weight of equipment. Increase seeding rates by 20% to compensate for seed mortality during the winter months.
Seeding a Forage Stand
Key Points:
- Forage stands must be seeded in a firm seedbed at a shallow depth, typically between ¼” – ¾” deep.
- Adequate soil moisture is one of the most important factors to stand establishment success.
- Bare grass seed is very light and needs either a carrier, such as cereal seed or granular fertilizer, to aid with flow through the drill. Coated seed can also be used.
- Direct seeding into a no till field can reduce moisture loss, erosion and soil crusting but seed placement can be less consistent if crop residue is heavy.
- Use lower fan speed on air drills for best results.
- Broadcasting typically has the lowest establishment success rate due to reliance on timely rains and poorer seed to soil contact.
- Companion crops can provide extra revenue or feed during the establishment year and protection against erosion and soil crusting, but compete with forage seedlings for light, moisture and nutrients.
- If utilizing a companion crop, harvest as early as possible and keep the cutting bar height high to leave adequate foliage on the new forage seedlings for regrowth
- Use the Establishing a Forage Stand worksheet to help you plan and prepare your new forage stand.
- Is there a difference in stand establishment between tilled, stubble and sod seedbeds? What about broadcasting?
-
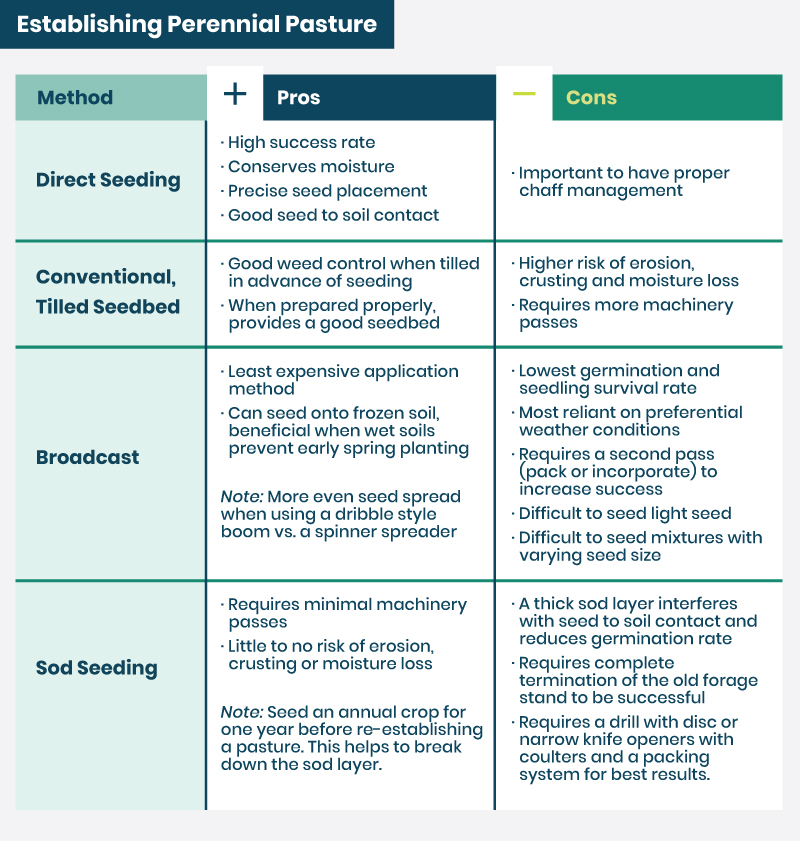
Each of these seeding systems have pros and cons and different machinery requirements which need to be taken into consideration. Direct seeding into crop stubble has had some of the highest success rates for stand establishment.
Tilled seedbeds that are prepared either the previous fall or early in the spring prior to seeding will minimize the moisture loss and erosion risk that accompany this type of management. Tilling can stimulate weed seed germination allowing for effective weed control prior to seeding. Seeding is carried out after tilling either with a seeder (e.g., air seeder, press drill) or by broadcast.
Direct seeding conserves moisture, allows for precise seed placement with good seed to soil contact, and the stubble provides protection for the new seedlings. However, proper chaff and straw management in the previous year is necessary for germination.
Broadcast seeding has the lowest rate of germination and seedling survival due to the lack of seed to soil contact and reliance on timely rains. However, in wet areas it can be used in the spring prior to the frost leaving the ground. This eliminates the risk of seeding later than planned due to wet field conditions as well as eliminating soil compaction from equipment on wet ground. When broadcast seeding, seeding rates are often increased by 25% to compensate for increased seed and seedling mortality. Incorporation of some type whether by rolling or harrow packing can be helpful to increase seed to soil contact. Seeders with heavy or rotary harrows may be used as well. Mixtures with varying seed size and weight are difficult to establish through traditional spinner spreaders as small, light seeds do not spread as far as heavier seeds causing uneven plant distribution. It may be useful to use an air driven, dribble type of boom spreader for even seed distribution.
Sod seeding into old forage stands has variable success rates. Seed to soil contact is necessary for successful germination. If the sod layer is too thick with residue and old root growth, seed to soil contact will be limited. If the old stand has not been successfully terminated, older forage plants will out compete the new forage seedlings. If sufficient sod decomposition has not occurred before seeding, stand establishment success will be limited. In these cases, it may help to delay seeding a year and instead seed a more vigorous annual crop into the sod. When seeding forages into sod, the use of disc or narrow knife openers with cutting coulters, combined with a good packing system, may provide the best results. Hoe openers will tear the sod, producing an uneven seedbed and rough pasture.
The graphic below summarizes the pros and cons of each of these establishment methods.
- How do I seed forages?
-
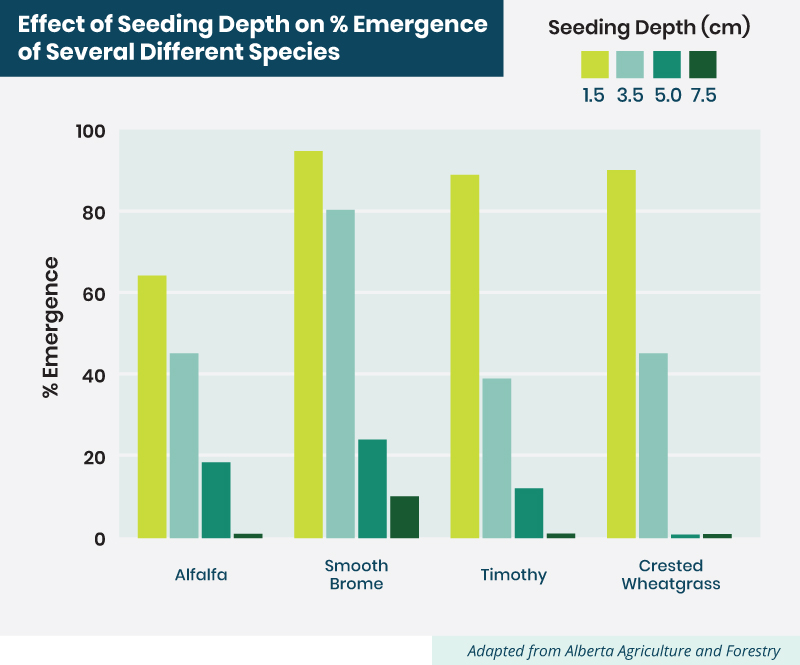
Forage seeds tend to be small, like alfalfa, and/or light, like many grasses. These characteristics make seeding forages a challenge. Since the seed size is small, seeding depth is very important. The smaller the seed, the less stored energy the seedling has to reach the soil surface and sunlight. Forages should be seeded between ¼” to ¾” deep depending on the forage species and soil type. As a rule of thumb, seed deeper in sandier soils and with larger seeds, and seed shallower in soils higher in clay content and with smaller seeds.
Many grasses have light and fluffy seeds that can be difficult to manage in a drill. Light seed can bridge in the tank and can have difficulty moving through the metering system. Mixing the seed with a heavier “carrier” seed such as wheat or oats can help the light seed flow through the drill more easily.
A carrier or coated seed is necessary when seeding forages with very small seeds that require low seeding rates that conventional metering systems cannot accommodate, such as Kentucky Bluegrass. If using an air drill, slow the air speed to the lowest setting. High air velocities can blow the light forage seed out of the furrow before the furrow closes. Using a carrier increases the volume and density of the seed mix and drill calibration must take this into account.
If planning on using a companion crop, the grass seed can easily be mixed with the heavier cereal seed. Alternatively, the grass seed can be mixed with 11-52-0 fertilizer for better flow throughout the drill. Seed mixed with fertilizer must be used immediately. It cannot be stored because the salt content of the fertilizer will increase seed mortality. When using coated seed, a carrier is unnecessary as the coating increases seed size and density for easy seeding.
- What type of drill should I use?
-
Most seed drills have the capability of seeding forages but considerations for the small, and often light, forage seed must be taken. A metering system that can accurately meter small seed is necessary. It is important to have a firm seedbed for optimal seed to soil contact and to have a uniform, shallow seeding depth for successful establishment.
If using an air drill, it is recommended to use the lowest fan speed setting. High air velocities can blow the light forage seed out of the furrow before the furrow closes.
When sod seeding, seed placement can be difficult. Disc or narrow knife openers with cutting coulters tend to provide the best results. Hoe openers rip the sod leaving an uneven field. Good in-row packing is required to ensure that the seed row is closed, and the seed is covered with soil.
- Should I seed a companion crop with my forage mix?
-
In order to reduce the competitive effects of a companion crop, consider cutting the seeding rate of the companion crop by at least half, and harvest the companion crop as early as possible, potentially as silage or greenfeed.
Companion crops, also known as nurse crops, are annual crops grown with the forage stand in the year of establishment. Companion crops are typically a cereal and may provide an economic return or extra feed in the first year of the forage stand when there is typically no harvest of the perennial forage. While the companion crop can ease this economic burden, it will compete with the forage seedlings for light, moisture and nutrients, which ultimately reduces the seedling density. The competition for moisture is exacerbated in drought years. However, companion crops can provide a certain level of protection against soil crusting, erosion, heat and wind, especially when seeded in tilled fields. Lower seedling density coupled with less robust forage seedlings entering winter can result in thin stands (higher winterkill), reduced forage yields, and increased weed pressure in the long run. If seeding a companion crop, reducing the amount of nitrogen fertilizer used may help to limit lodging and competition with the forage seedlings. If a single drill pass is being used to seed both the companion crop and the forage stand, prioritize the forage stand when choosing the seeding depth. If separate seeding passes are being used, consider cross seeding the companion crop to minimize competition.
If seeding a forage species that is difficult to establish, if moisture availability is low, or if seeding in the Brown soil zone, a companion crop may not be appropriate.
Maintaining a Forage Stand
Key Points:
- Evaluate the forage stand during the establishment year and the following spring. Check several locations across the pasture.
- If needed, reseed the field or patches with low establishment early by direct seeding or broadcast seeding.
- Delay grazing until the year after establishment, possibly longer.
- Control weeds, if necessary, by cutting or mowing at a high cutter height. Remove cut material if necessary. Herbicide can be used for control depending on the weed and forage species.
- Pure grass stands often require nitrogen fertilization to maintain productivity.
- Mixed grass legume stands can fix enough nitrogen to maintain productivity with proper grazing management.
- Why should I evaluate a new forage stand?
-
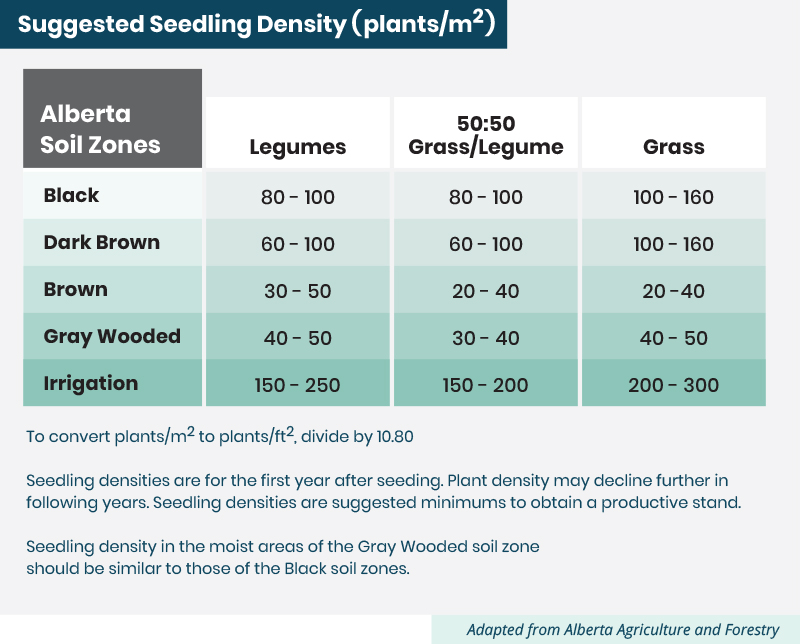
Evaluation of a new forage stand is necessary to determine establishment success. The stand should be evaluated in several locations across the pasture for seedling density. This evaluation should take place approximately 90 days after seeding and again the following spring. If a companion crop is seeded with the forage, the first evaluation should take place after companion crop removal. Keep in mind that perennial forages are slow to establish compared to annual crops.
If there are areas of the pasture that are bare or have low seedling counts, reseeding is an option. Direct seeding these patches, or if required, the entire field, is generally the best seeding method. Direct seeding provides proper seed placement while minimizing disturbance to the existing forage plants. Reseeding early has the best results, especially with alfalfa. Remember that existing alfalfa plants can have a toxic effect on new alfalfa seedlings, hindering seedling survival.
If the bare patches are small and minimal, broadcasting seed to fill these spots in can be more economical. Remember that broadcasting requires higher seeding rates and adequate moisture for success.
- My forage stand is weedy, what should I do?
-
Depending on the mix of forages seeded, the herbicide options for chemical control of the weed population may be limited. A straight grass stand or straight legume stand will have more herbicide options available than a mixed grass and legume stand.
If herbicides are used, follow label directions closely and be aware of grazing restrictions for each herbicide. Work with your local agrologist to find the products that are right for your situation.
If herbicide is not an option, mowing or swathing the weeds to remove the seed heads and open up the canopy can help manage competition. If mowing or swathing, use a high header height to leave as much of the forage plant intact as possible for quicker regrowth. If the swath is substantial, it is best to remove the weedy material by baling or silaging so that the forage seedlings are not smothered beneath the swath. In newly established stands, grazing should not be used as a control method.
When baling or silaging weedy material for livestock feed it is important to check for the presence of toxic plants. If toxic plants are present in a significant number, the weedy material should be disposed of and not fed to livestock. Silaging weeds that have viable seed heads may be an option as the ensiling process reduces the viability of weed seeds. Baling weeds with viable seed heads has the risk of spreading these weeds to feeding areas.
- Now that the forage stand is seeded, when can it be grazed?
-
It is undesirable to graze the forage stand during the establishment year. Grazing in the establishment year results in lower seedling survival through the grazing season and further plant loss over the winter. Depending on stand vigour, newly established pastures can be usually be grazed the year after establishment.
However, if stand establishment was poor or the plants are weak due to environmental stress, delaying grazing until the second year after establishment is recommended. Proper grazing management principles should be adhered to, especially when grazing a very young forage stand. It is highly recommended to apply the “take half, leave half” rule of thumb when grazing to reduce risk of stand injury.
Test your knowledge
Information adapted from
- Forage Establishment
Beef Cattle Research Council webpage - The Alberta Forage Manual: Perennial Forage Establishment
Alberta Agriculture and Forestry PDF - Successful Forage Crop Establishment
Saskatchewan Forage Council PDF
Toolkit
other resources
- Weed and Brush Control in Pastures
Beef Cattle Research Council webpage - Historical Review of Forage Fertilization Research
Beef Cattle Research Council webpage - Forage U-Pick
interactive decision tool - No-Till Establishment of Forage Crops
The University of Tennessee PDF - Tips for Improving Forage Establishment Success
Manitoba Agriculture, Food and Rural Initiatives, Agriculture and Agri-Food Canada and Manitoba Forage Council PDF - Soil Quality and Moisture Conservation Benefits of Direct Seeding
Alberta Agriculture and Forestry PDF - Residue Management for Successful Direct Seeding
Alberta Agriculture and Forestry PDF - Forage Seed: BMPs for Invasive Plant Species
Saskatchewan Forage Council PDF - Hay: BMPs for Invasive Plant Species
Saskatchewan Forage Council PDF


