Make informed decisions for your operation with information delivered right to your inbox.
Get the latest tools, innovations and science-based information for the Canadian beef industry, including seasonal production considerations and economic analyses.
Calving systems, management and timing can vary significantly from one farm to another and across the country. However, all systems share common goals, such as ensuring the birth of a healthy calf, maintaining the cow’s health, and preparing her for successful re-breeding. Several factors can influence the achievement of these goals, including calving difficulties, diseases, injuries, and weather conditions. Having effective management practices in place can help minimize death loss in calves.
Key Points
Good management is the best defense against common problems such as: weak calves, dystocia, scours, dehydration, pneumonia, and failure to rebreed.
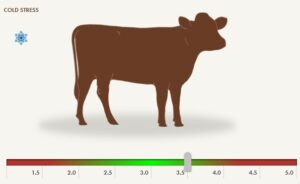
Producers can minimize dystocia by choosing the appropriate sires for cow size and development, maintaining cows at a body condition score of 3-3.5, and selecting cattle for the environment.
Calve heifers 2-3 weeks before cows for concentrated surveillance and improved longevity of heifers in the herd.
There is no one size fits all for calving seasons. Producers must consider many factors when choosing when to calve.
Timely assistance can lead to up to a 9% increase in the number of animals cycling at the onset of the breeding season and a 14% increase in pregnancy rate.
Once a water bag appears, a calf should hit the ground within one hour for cows or up to one and a half hours for a first-calf heifer
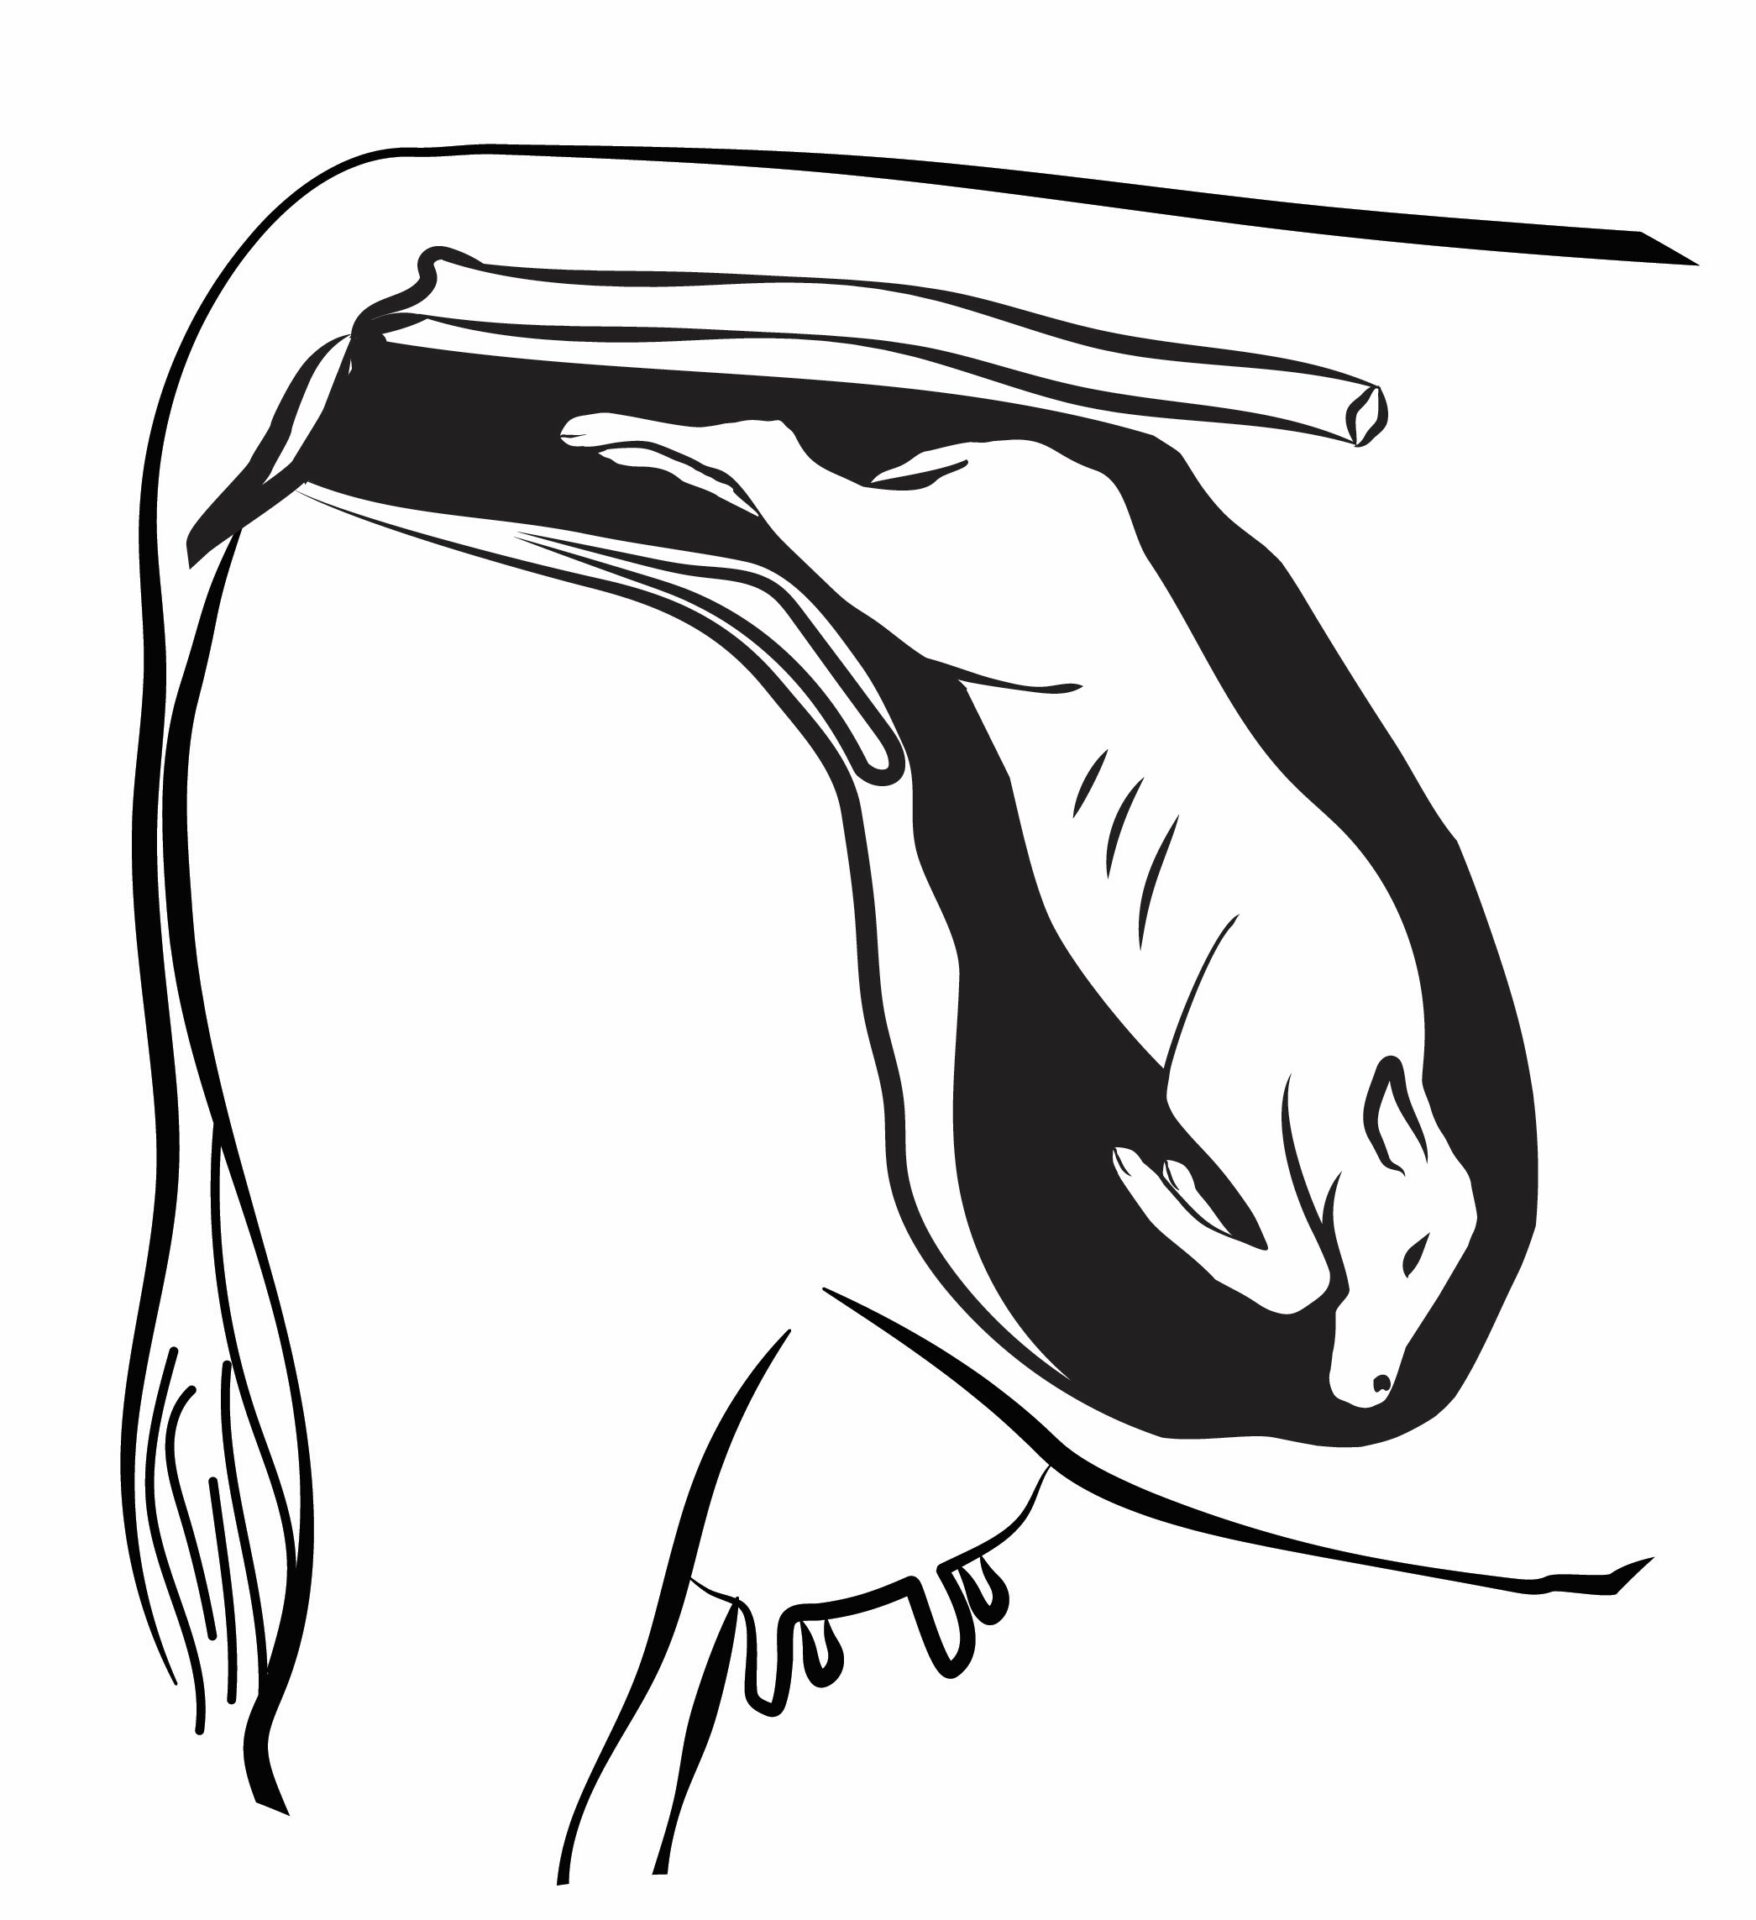
If a calf is born needing resuscitation, it is recommended to use the calf recovery position, straw in their nose, water in their ear, or to rub vigorously. These techniques are recommended over hanging the calf upside down.
Calves that do not receive adequate amounts of colostrum immediately after birth are at a much higher risk of becoming sick and are also more likely to die.
The calf VIGOR scoring system provides a good indication if calves need further intervention.
When using an esophageal feeder to tube a calf, always keep the calf in a neutral position to ensure you do not place the tube feeder in the trachea of the calf.
A cow should deliver her placenta within 8-12 hours after giving birth, anything longer is considered a retained placenta.
There are three different categories of prolapse, a uterine prolapse is a veterinary emergency.
Calves that are grafted onto a cow should be from within the producer’s own herd to prevent disease transfer.
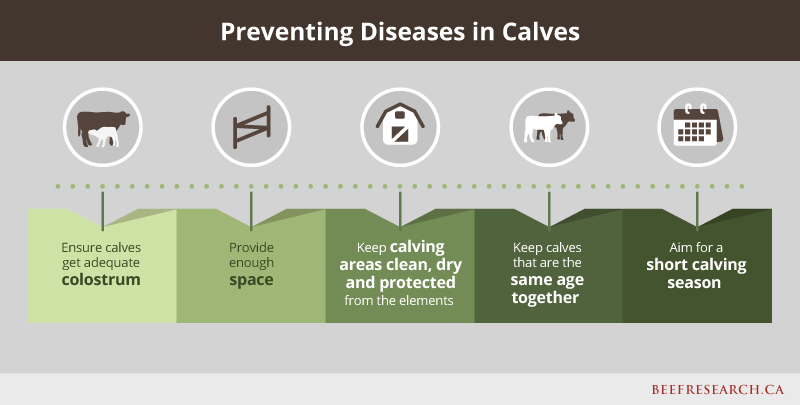
Many of the disease agents that cause diseases such as scours in young calves are already in the herd and are often found in the manure of cows within the herd. Ensuring calving areas are clean and dry and that calves have adequate colostrum will be the best disease prevention.
Preparing for Calving
Calving management is a year-round process and the effort to wean healthy, heavy calves starts long before the calving season. Selecting bulls and replacement females that are healthy and match the environment and the goals of each breeding program, maintaining proper biosecurity by washing clothes and boots worn on other farms, controlling visitors and quarantining new animals or those who have been off farm, all help to keep calves’ disease free. Managing the nutrition and mineral supplementation of cows year-round, including grazing management plans, as well as an up-to-date vaccine protocol, all tie back to having healthy, vigorous calves.
Video: One Health Strategies Help Family Farm Navigate Outbreak in “Winter from Hell”.
Calf Loss
Limited data is available across Canada, but recent surveys suggest the industry average is a 4-8% death loss from birth to weaning on calves born from cows. This report also found that calves born to heifers had greater mortality rates during the first 24 hours than calves born to cows. This underlines the importance of early intervention to reduce losses during calving. These same surveys also found that the main causes of calf mortality were:
calving heifers, which may be at higher risk for dystocia, 2-3 weeks prior to cows allows for concentrated surveillance.
Early calving for heifers also allows them to calve in the cleanest calving environment, especially if it is not possible to move the herd and calving of the entire herd occurs in one location. This will help reduce the risk of disease in calves born to heifers. Although this helps to reduce the disease burden, it is not a substitute for other management procedures that reduce disease.
Heifers also need more time to return to estrus than cows do, since it takes them longer to start cycling after they have had a calf. Breeding them early gives them a chance to catch up with the cows and be bred early in the breeding season next year. This greatly increases their chance of remaining in the herd longer.
There are many considerations when choosing a calving season. Genetics, labor, infrastructure, weather, and tradition are only a few of the complicated factors that influence when a producer chooses to calve out cows, and there is no one-size-fits-all approach.
To identify an abnormal calving, a producer must have a thorough understanding of what a normal calving process looks like, from beginning to end. This involves being aware of the three stages of labor. Understanding this terminology and the processes it describes can also be crucial when discussing any issues with your veterinary team.
What happens when something doesn’t go as planned? What if a calf comes backwards or a leg is turned back? Producers need to be prepared to assist a cow having a difficult birth (dystocia), including the knowledge of how and when to help.
Besides being a problem at the time of birth, dystocia is related to higher incidence of disease and preweaning mortality.
Dystocia can directly cause a calf’s death or indirect losses by increasing the susceptibility to infectious disease. Calves that survive dystocia are 2.4 times more likely to become sick during the first 45 days of life. A study looking at herds in western Canada found that calves that were assisted at birth were 10-15% more likely to be treated for disease and had a 9-18% higher chance of mortality.
The ideal cow body condition score is 3.0-3.5.
Dystocia is a complex issue influenced by many factors including genetics, cow management, age of cow, number of calves, fetal presentation, and nutrition. While producers can minimize dystocia by choosing the appropriate sires for cow size and development, maintaining cows at a body condition score of 3-3.5, and selecting cattle for the environment, some instances of dystocia are likely to occur. Through the Western Canadian Cow-Calf Surveillance Network, researchers found that average herd level of assisted calving was 4.9%. While that number may look relatively small, 90% of producers assisted at least one calf during the previous calving season so dystocia does have profound impacts on the bottom line
Video: How to intervene with a difficult calving
Take the time to prepare
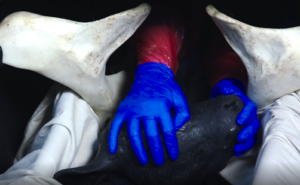
Clean the cow and work area of any manure or debris that could be introduced into the reproductive tract.
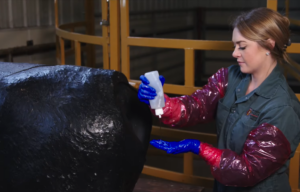
Wash the cow and your hands: Cleanliness (00:09) is an important step that is often overlooked despite evidence that using poor hygiene when palpating animals can lead to long term reproductive issues and delays in breed back intervals.
Wear gloves: Wearing palpation gloves will reduce the risk of contracting zoonotic diseases (transmitted from animals to humans) such as Q fever and leptospirosis.
Use lubrication: Even the hair on a bare arm is enough to tear the delicate tissues of the birth canal. Proper lubrication will ensure that uterine tears and abrasions won’t lead to further complications and problems rebreeding.
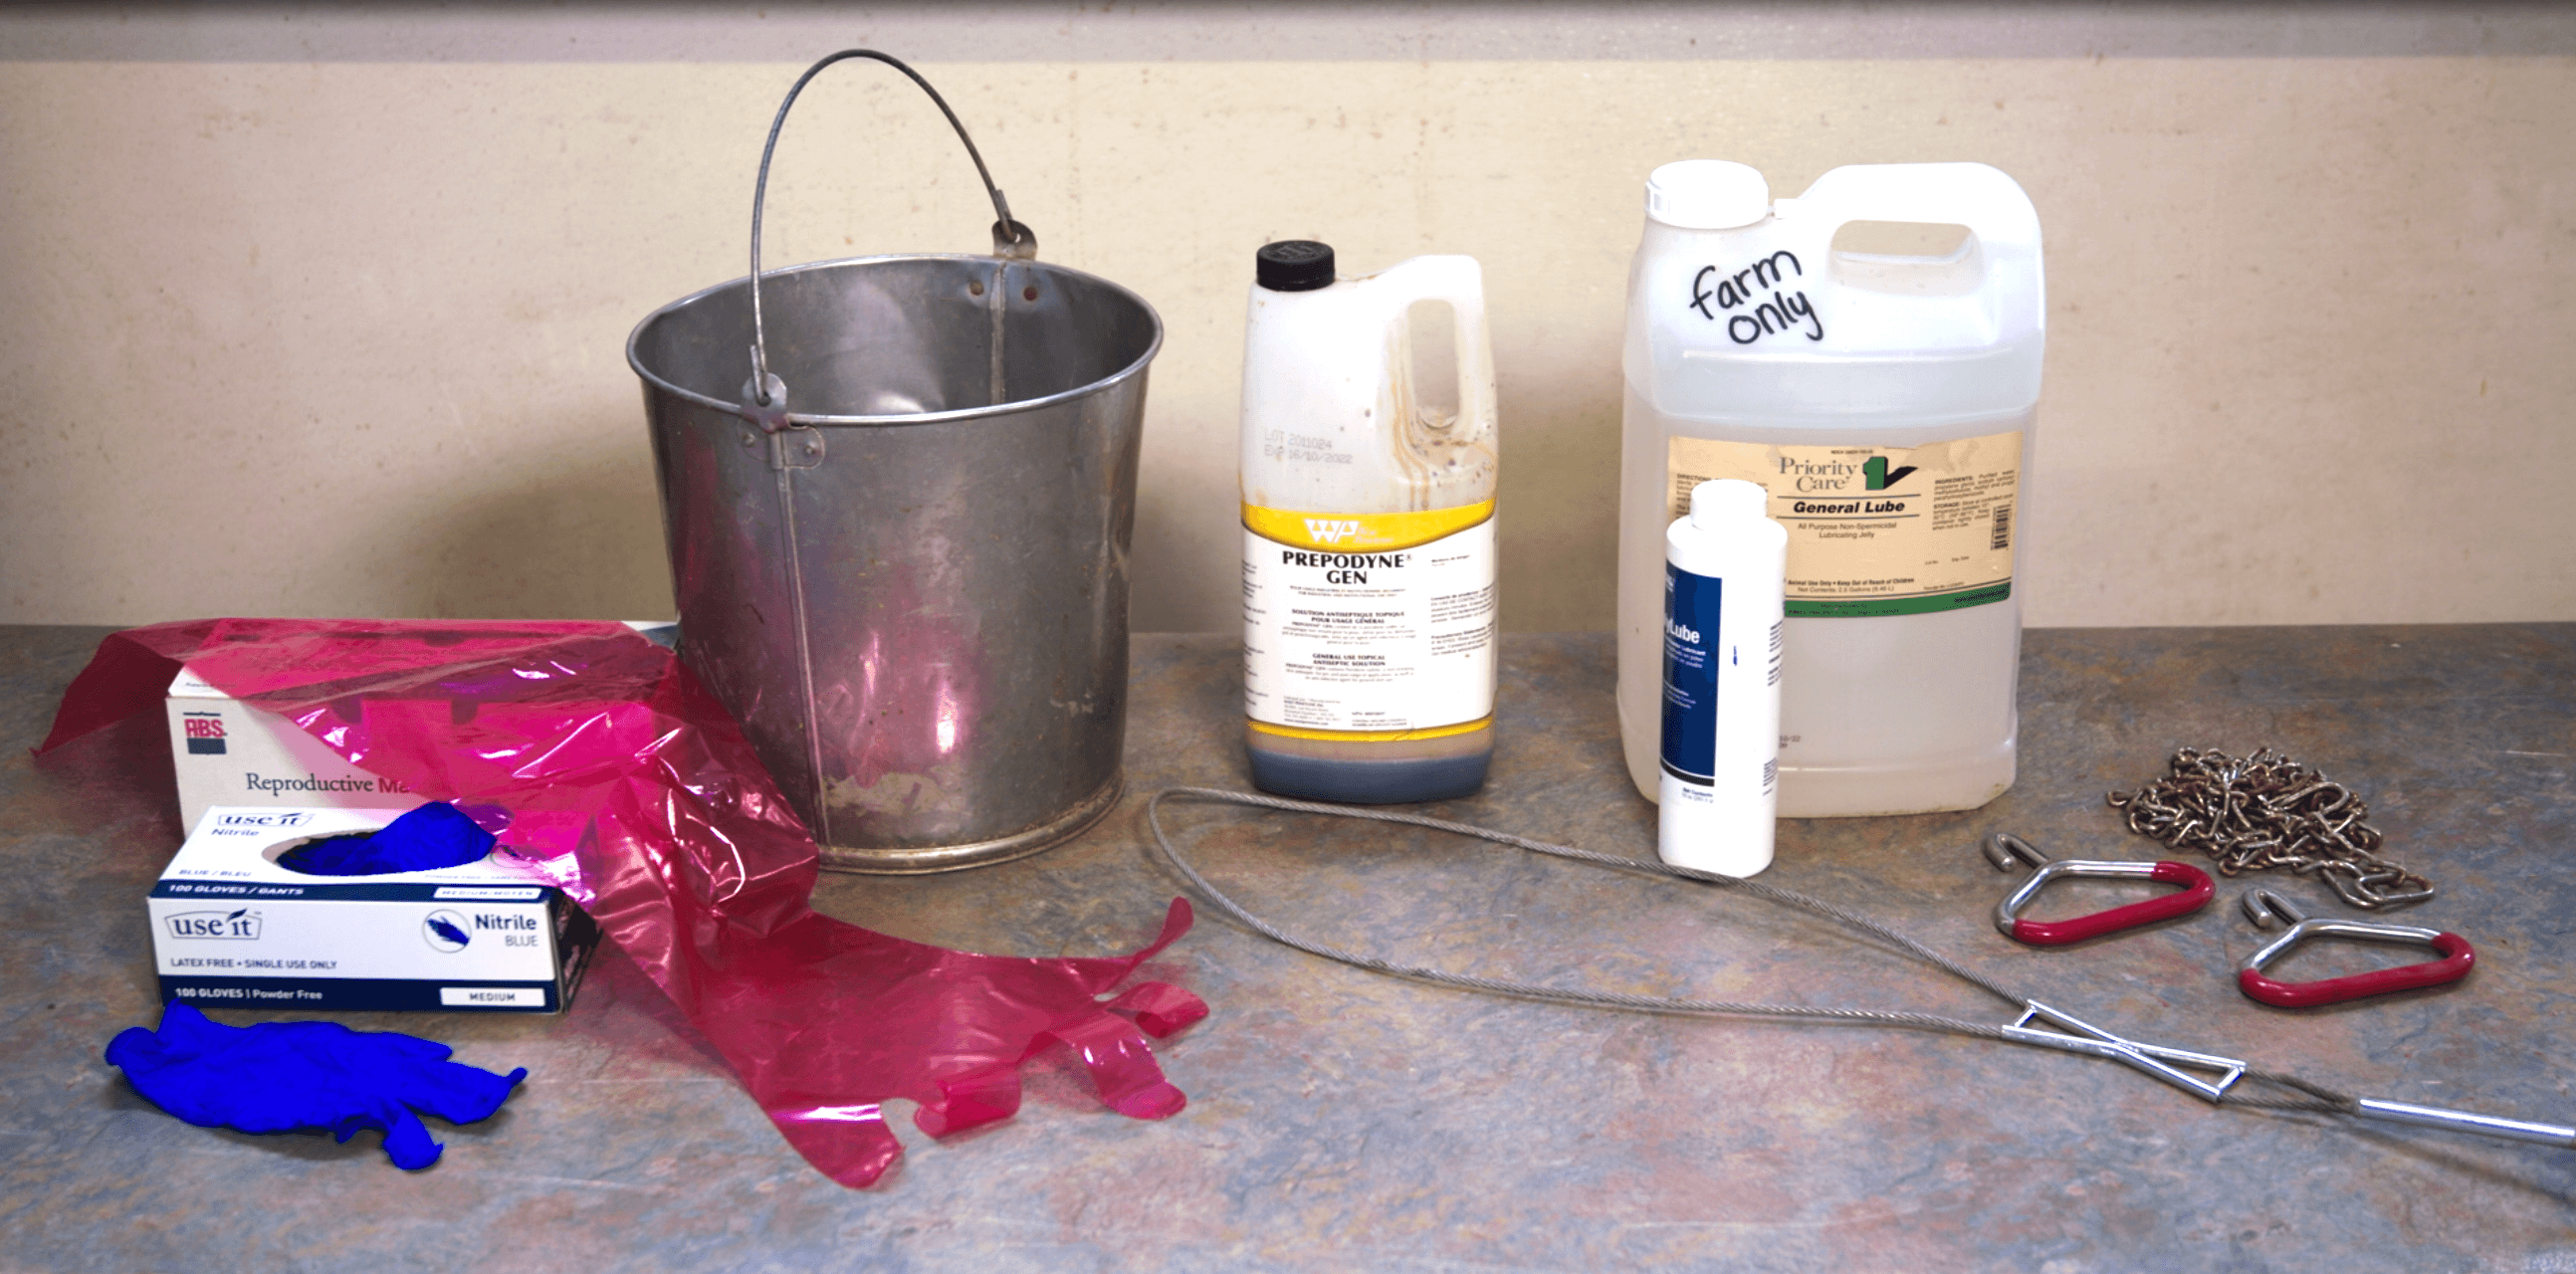
Common Calving supplies
Hover over the pins in the image below for descriptions:
It is important to check to ensure the cow is properly dilated prior to delivery.
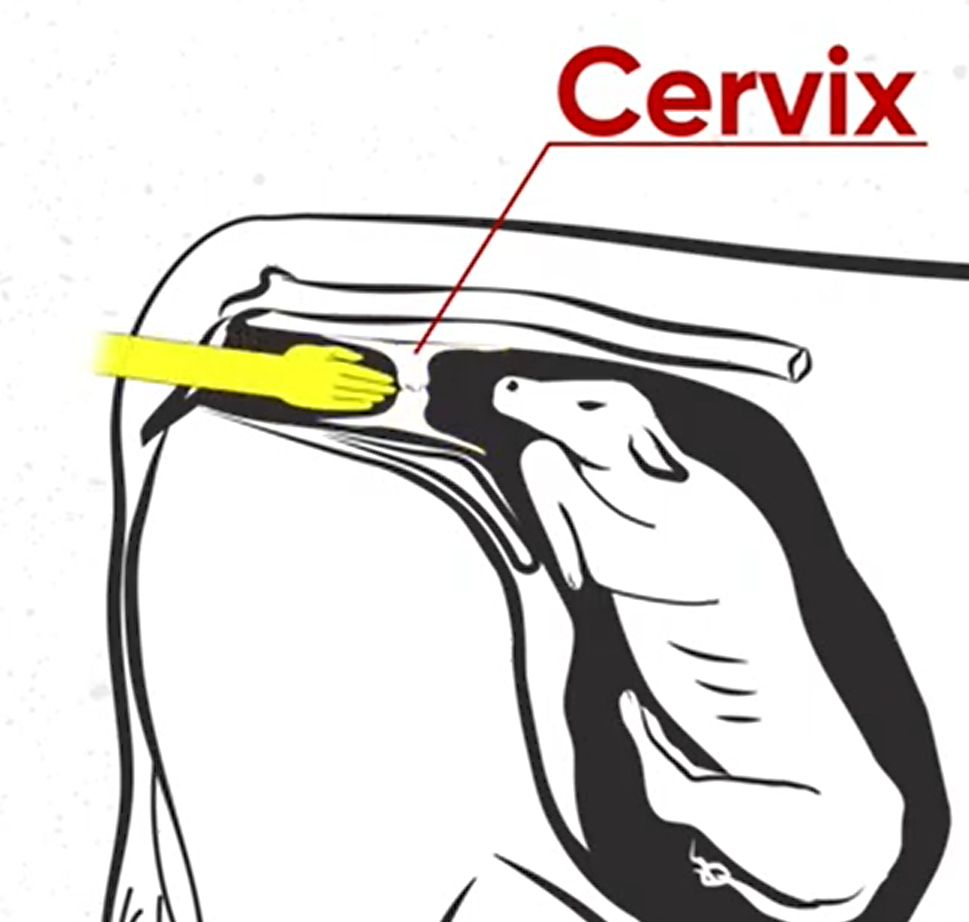
Check the Cervix
Palpate the cervix: For a calf to be delivered vaginally, the cow’s cervix must be open or “dilated.” (00:47) If the palpator is finding it difficult to reach the calf or theirhand is running into a blind sac, it is likely that the cow has not properly dilated.
Determine the status of the calf
Decide if there is room for the calf to be delivered: Run a hand around the circumference of the calf between the calf and the cow’s pelvis. (1:21)
If your hand fits between the calf and the cow, then she likely has enough room to deliver the calf with assistance. If you are unable to fit a hand in that space, veterinary assistance is recommended.
Check if thecalf is alive: To determine the calf’s viability, place a finger in its mouth for a suck reflex or tongue flick. The eyes can be checked for a blink, and in-between the toes can be pinched to check for a response.
Assess an abnormal presentation: It can often be difficult to determine if the legs coming first are front limbs or hind limbs. One simple trick to determine this is to bend the joints of the lower leg. If the joints are both bending in the same direction, they belong to the forelimb. If they bend in opposite directions, they belong to the hind limb. (1:41)
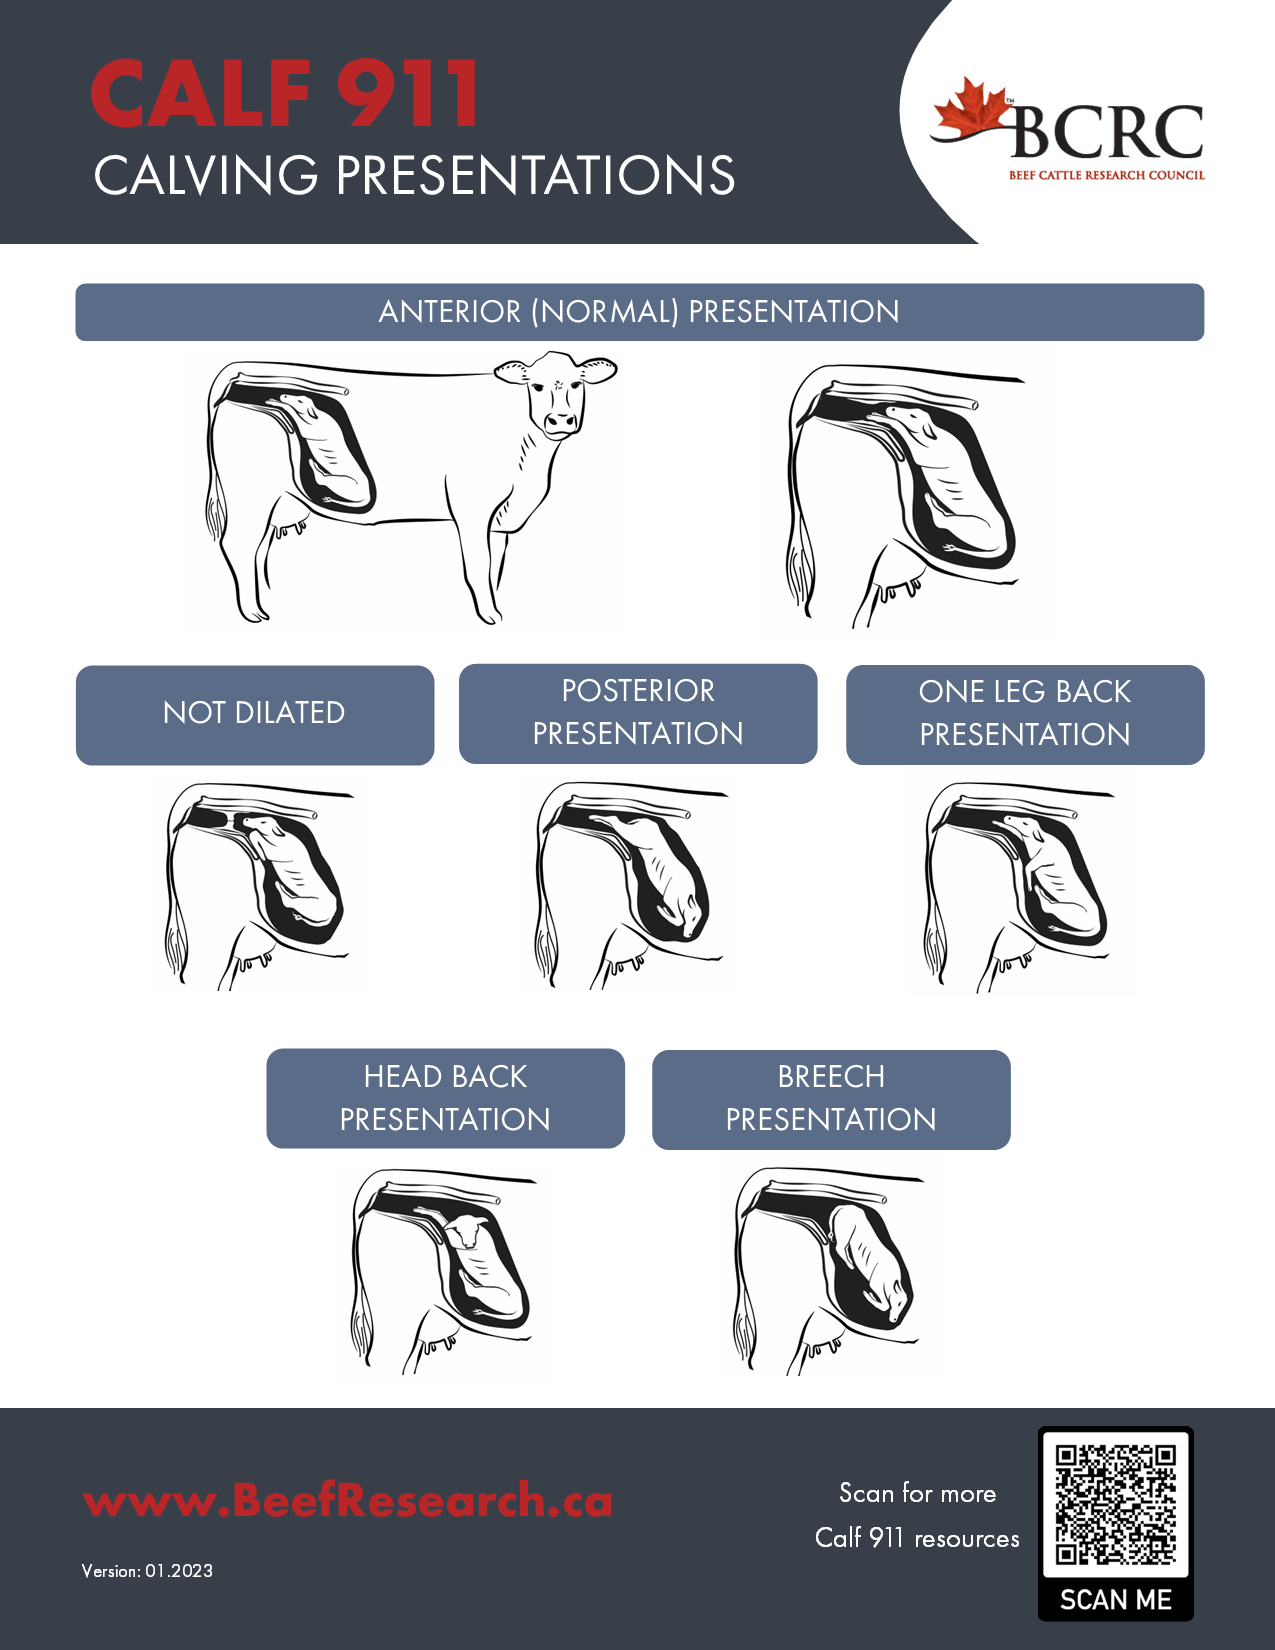
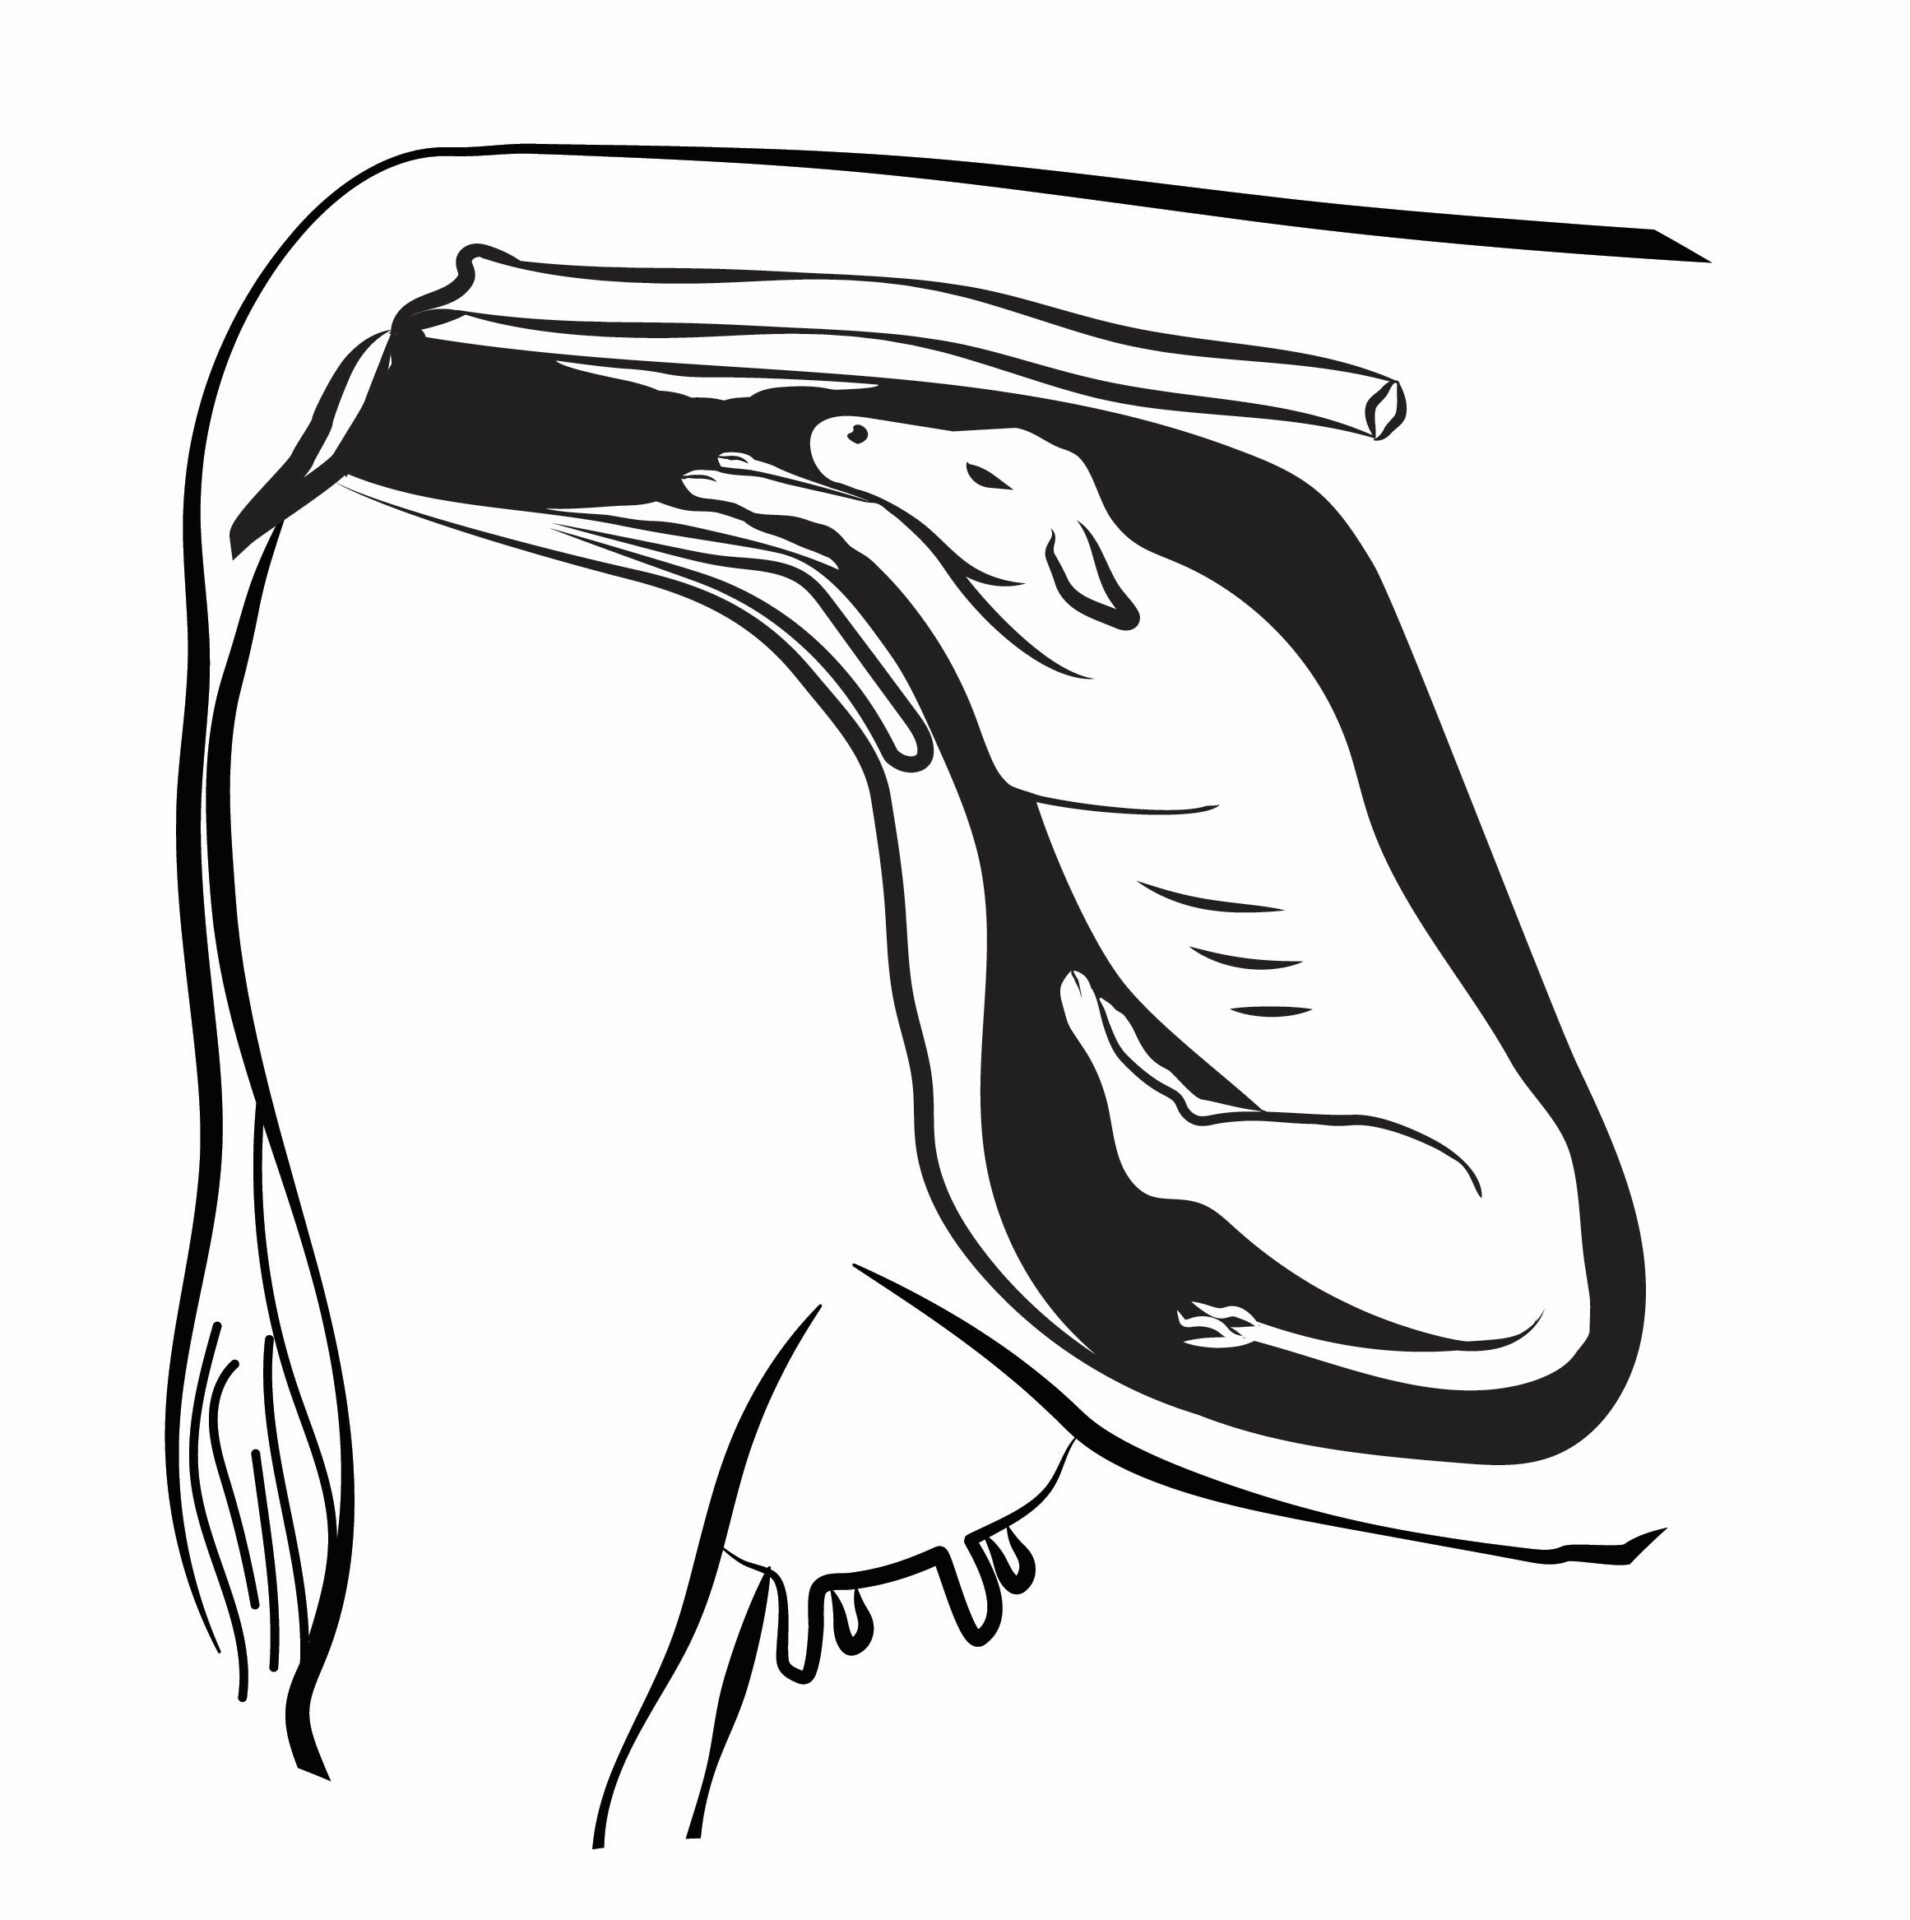
Normal Presentations:
A normal presentation for a calf to be delivered is “anterior” or forward facing, with a head and two front feet coming first.
A normal “posterior” or backwards calf comes with two hind feet and a tail first.
Head back: Calves that have their head pointed backwards will need to be gently pushed back into the uterus by putting pressure on the calf’s chest while the cow is at rest. (2:22)
When dealing with a head back position, the head can be slowly brought into position by gently grasping the muzzle, the ear or the lower jaw.
Once it is pushed further back and the producer has more room to work within the cow, the head can be adjusted and brought up to the pelvic inlet. This can be done bygrasping the mouth with one hand or placing your thumb and middle finger in the eye sockets. Care must be taken to never pull hard on the lower jaw as it can easily be fractured or injured.
Alternatively, a calving snare can be very helpful to help secure a calf’s head. The calving snare can be placed around the poll, behind the calf’s ears, and then secured in the mouth of the calf. The head can be deflected up and around into proper positioning, always being careful to protect the muzzle of the calf with your hand to protect the soft tissues of the cow from the sharp incisor teeth of the calf.
Once the head is in proper position, traction is placed on the legs to deliver the calf. It is important to note that often when a calf presents with a head back, it is due to a lack of room for the calf to advance into the pelvis. Care must be taken to ensure that the calf is not too large to be delivered vaginally.
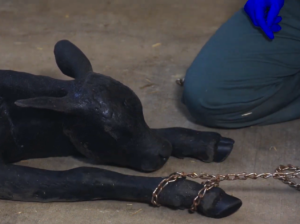
Leg back: When correcting a retained limb, or a “leg back,” the same method of pushing the calf back into the cow to create more room is applied. The producer can work their way down the leg until the foot is reached, then cup the foot to protect the uterus from damage from the hoof capsule. Once the foot is secured, bend all the leg joints, and move up toward the spine and forward toward the cervix. (3:13)
Place calving chains in a double half hitch over the top of the toes.
Apply Calving chains
Use a double half hitch: Unfortunately, many calves suffer broken legs due to improperly placed calving chains. The proper placement and use of the double half hitch method is outlined in the video ensuring that pressure is placed evenly on the legs and helping to direct the toes downward with each pull, ensuring the toes stay far away from the delicate tissues of its mother. (3:51)
Pull the calf
Work with the cow:Only pull or apply pressure when the cow is having a contraction or “pushing.” Never pull when she is at rest.
Use a seesaw method:Thisis a technique which applies pressure on alternating legs as the calf advances into the birth canal. This allows for the widest part of the calf to enter the pelvis one shoulder at a time, creating more space. (4:35)
Apply pressure in an arc: For a forward-facing calf, pressure should always be applied in the shape of an arc as the calf moves through the birth canal. Begin by applying force in an upward motion as the front feet and head are advanced, then the chest is delivered by pulling straight back, and finally the pelvis and hind limbs can be pulled in a downward fashion to allow gravity to aid in the delivery. (5:03)
Rotate the pelvis: If the pelvis of the calf is binding in the cow’s pelvis, it can be manually rotated to 45 degrees, shifting the hip angle and preventing hip lock.
Cross the hind limbs: In the case of a backwards calf, it is helpful to cross the hind limbs when pulling. This will cause the calf’s hips to rotate preventing hip lock.
Prolapse refers to an internal organ making its way to the outside. When referring to cattle, there are three types of prolapse, and knowing the difference between them is important when deciding the urgency of veterinary care, and whether you need to cull an animal.
Types of Prolapse:
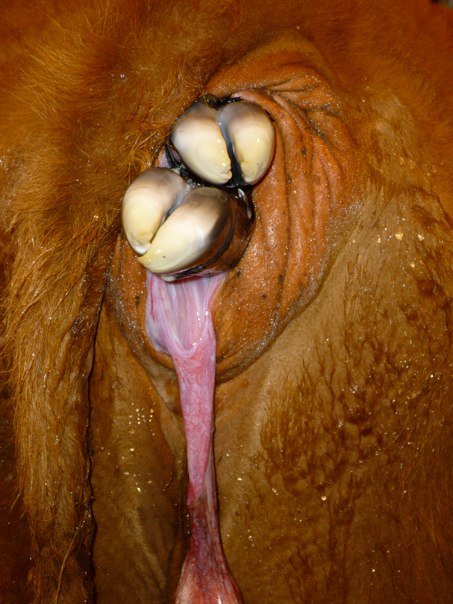
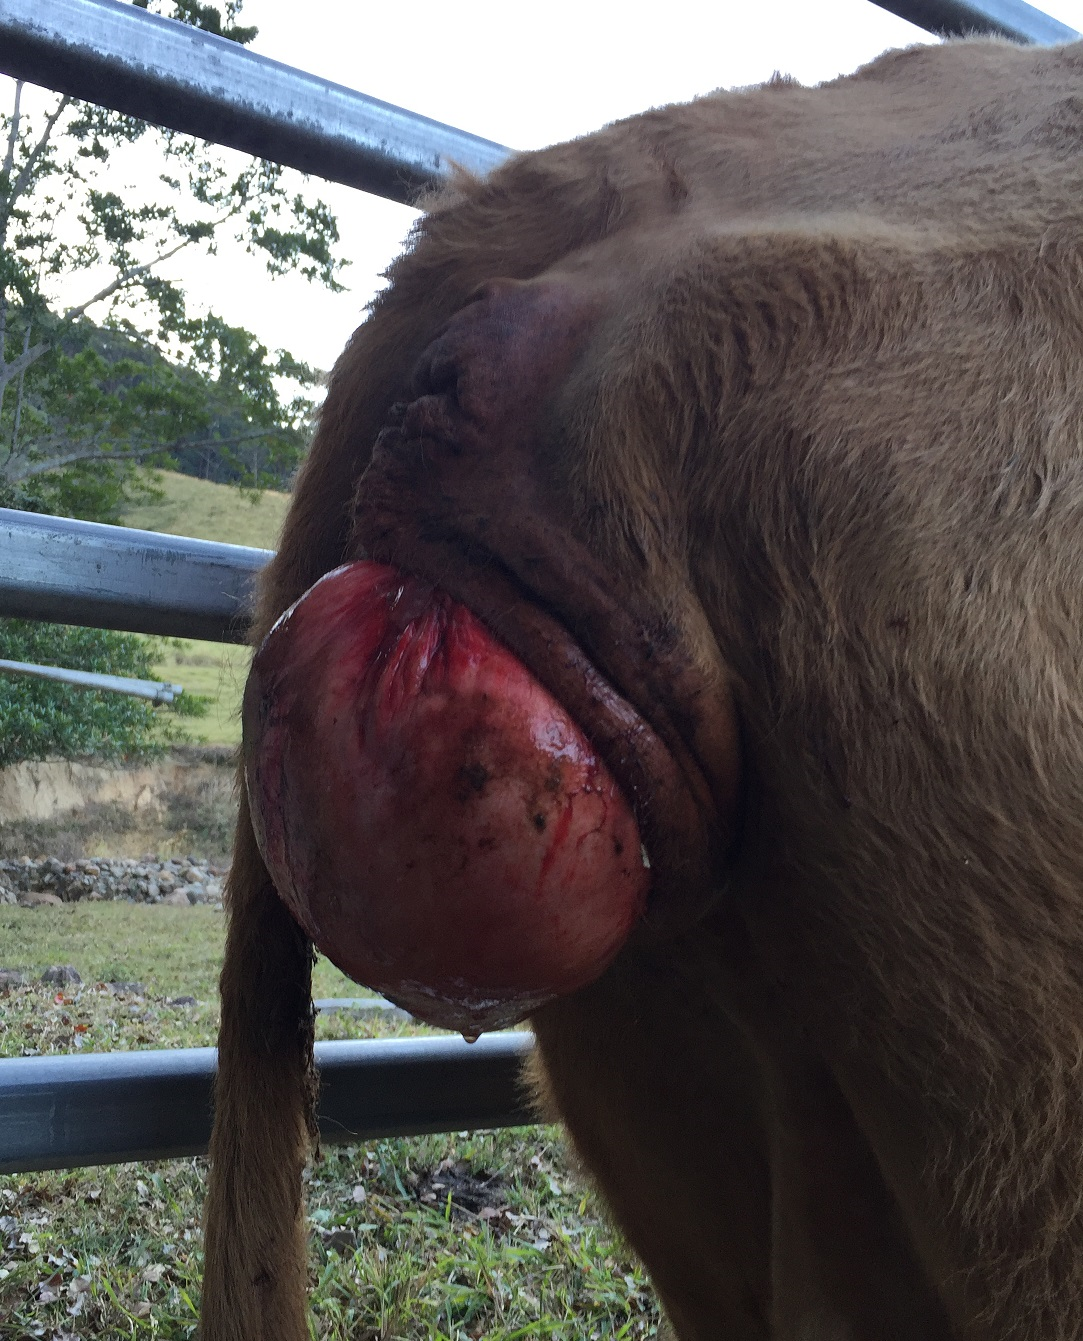
Uterine prolapse
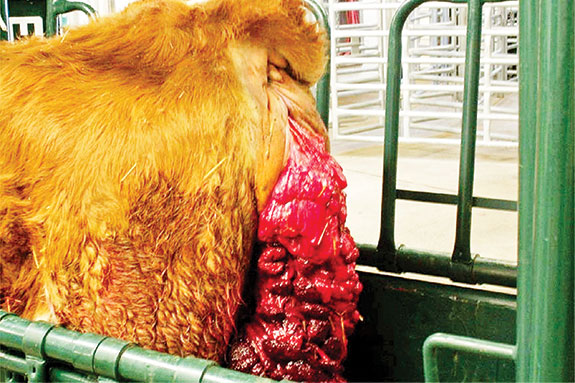
Uterine: A uterine prolapse occurs when the entire uterus or “calf bed” is expelled through the vagina after the birth of a calf. This massive organ can hang down to a cow’s hocks and is easily identified by its size and the button-like structures (the caruncles) that cover the surface. A uterine prolapse can lead to organ damage and the rupture of the uterine artery, this makes it a veterinary emergency. Because of the risk of artery rupture, a uterine prolapse should never be hauled in, but rather the veterinarian should come on the farm and the cow should be handled as little as possible. Uterine prolapse is situational, not genetic, so culling for genetic reasons is not necessary, however, many choose to cull based on possible difficulties in rebreeding.
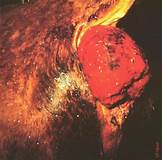
Vaginal prolapse
Vaginal: A vaginal prolapse is the expulsion of the vagina and sometimes the cervix. This condition generally occurs in over-conditioned cows, those on heavy dry matter diets or those carrying large calves. The pressure of a full rumen, combined with a heavy fetus puts pressure on the cervix, causing the vagina to prolapse. Vaginal prolapse can be identified as a smooth smaller ball-like structure protruding from the vaginal opening. This type of prolapse is not an emergency and can be corrected by a veterinarian during a regularly scheduled appointment. Vaginal prolapse can come and go, and some will resolve after calving, however, if the tissue is constantly protruding, and or showing any signs of damage a veterinarian should be consulted. Vaginal prolapses have a genetic component, and culling is generally recommended after calving as recurrence with subsequent pregnancies is extremely likely.
Rectal prolapse
Rectal: Rectal prolapses occur when the internal portion of the rectum protrudes through the anus. This generally occurs in fed cattle and is not related to calving.
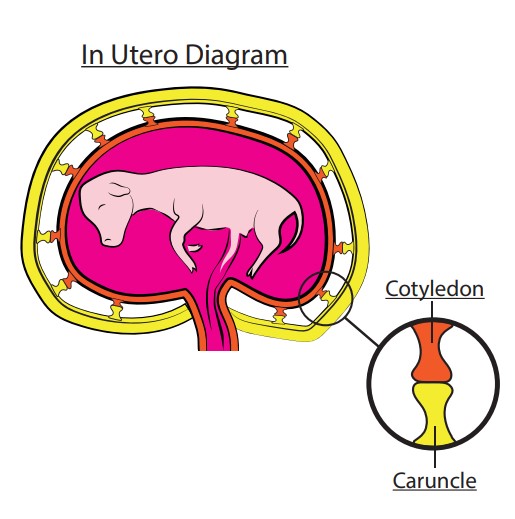
Beef cow placenta structure
Retained Placenta
A placenta is the structure formed by the apposition of fetal and maternal tissue. It functions to exchange nutrients and oxygen from the mother to the fetus, and waste products from the fetus back to the mother. Normally this structure is shed along with other fetal membranes in the third stage of labor, 3-8 hours after the calf is born hence the term “after birth”.
Retained placenta is a rare condition among most cow herds. It happens when the cotyledons (commonly known as “buttons”) on the fetal side of the placenta fail to detach from the caruncles on the uterus during birth, which can occur after a difficult birth (dystocia) in beef cattle. Also, a higher incidence of retained placenta may be observed in cows induced to calve, cows that have delivered twins, and cows suffering from some mineral deficiencies. A retained placenta can very quickly become an unpleasant condition for anyone in close contact with the affected cow. However unpleasant the sight or odor may be, it IS NOT recommended to attempt to remove the placenta manually. Pulling the placenta before it is ready to detach can potentially damage the uterine structures, and cause tearing that could lead to infection. It is recommended to let nature take its course and allow the placenta to detach itself on its own and only intervene if the cow is showing symptoms of systemic illness and or infection. Treatment with antibiotics is not generally recommended nor required. If in doubt, and it is more than 12 hours after calving, consult a veterinarian for treatment advice.
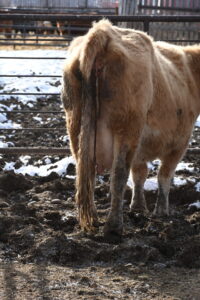
Retention of fetal membranes, or retained placenta, in cows usually is defined as failure to expel fetal membranes within 24 hours after parturition. Normally, expulsion occurs within 3–8 hours after calf delivery
A retained placenta can quickly become an unpleasant condition
Calving is a natural process, and most cows give birth to a healthy calf and everything goes as planned. However, there are times when things go wrong. Perhaps there is a malpresentation, such as a backwards arrival, or the calf’s foot is back. In some cases, perhaps calves do not take their first breath after a difficult labour.
Here are a few tips to consider to get a calf up and going as soon as possible:
The recovery position allows the calf’s lungs to expand with the least amount of pressure.
Position the calf in the recovery position with both front legs tucked underneath their chest or out in front of them and back legs on each side of the body, pulled towards its head. This allows the calf’s lungs to expand with the least amount of pressure, making it easier for the calf to breathe.
Avoid hanging calves over gates or upside down. Hanging a calf upside down causes its stomach and intestines to press down on the diaphragm and compress the lungs, making it harder for the calf to breathe. Although fluid will come out, this fluid is from the stomach, not the lungs.
Rub the calf vigorously with a towel or your hands which can often help the calf ‘wake up’ and start breathing.
Gently poke the nasal septum, the . This may cause the calf to gasp and take a deep breath in, and initiate the breathing process.
Squirt a few drops of water in a calf’s ear which can often cause them to gasp and start breathing. Be careful not to fill the ear with water as this could cause an ear infection.
Consider giving a pain control product, such as meloxicam, to cows and calves after a difficult birth. Recent work at the University of Calgary showed slight statistical improvements in weight gain during the first week of life. Furthermore, without being told which calves had received the pain control product, producers were able to identify calves that had received the pain control product. They noted that these calves appeared brighter, mothered up faster, and were let out of the barn sooner.
Video: How to (and not to) resuscitate newborn calves
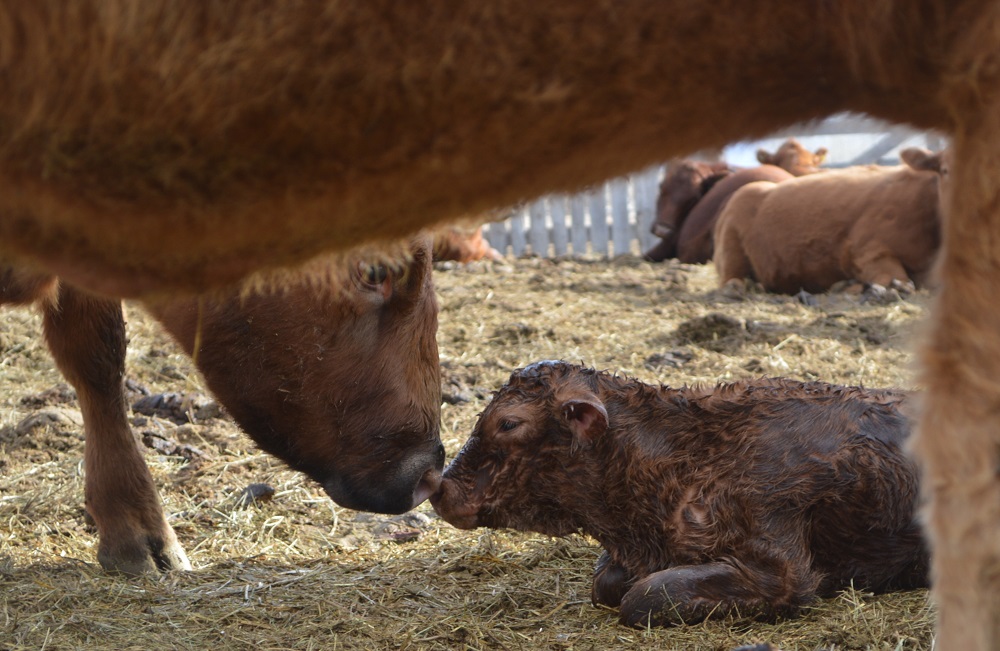
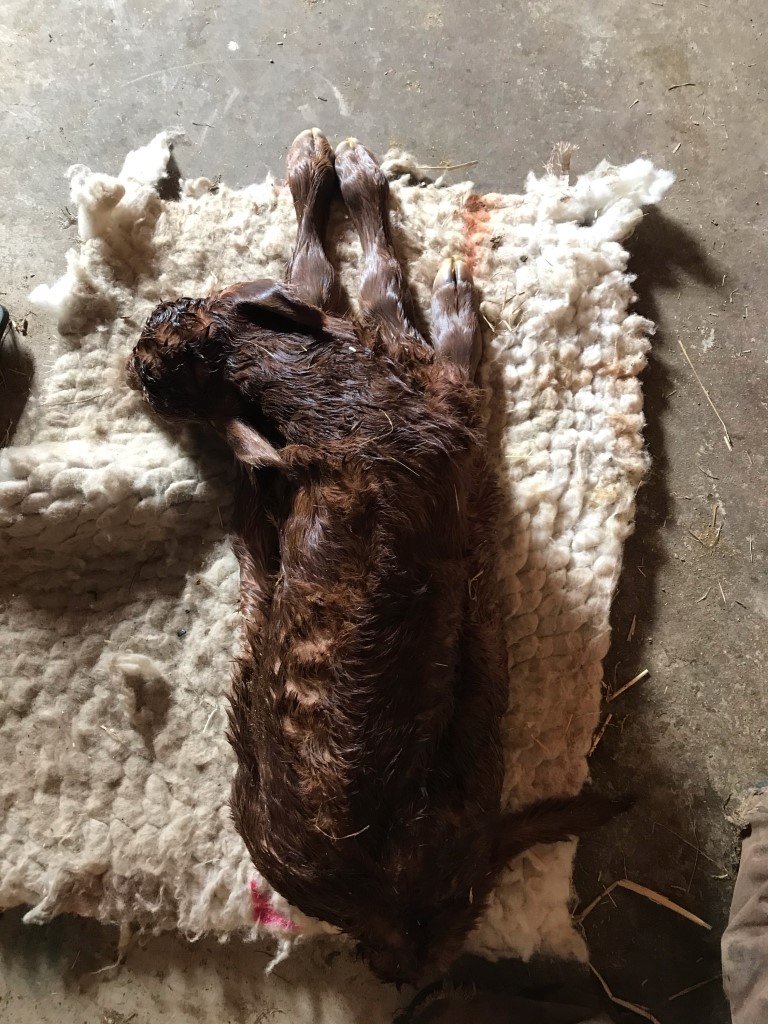
Ideally, after a calf is born, things go well, and the cow and newborn calf thrive. However, it is important for producers to know how to assess calves for subtle signs of distress or trauma that can occur due to a difficult calving.
Good vigor is a vital characteristic. A vigorous newborn calf has the best chance to remain healthy and productive within the herd.
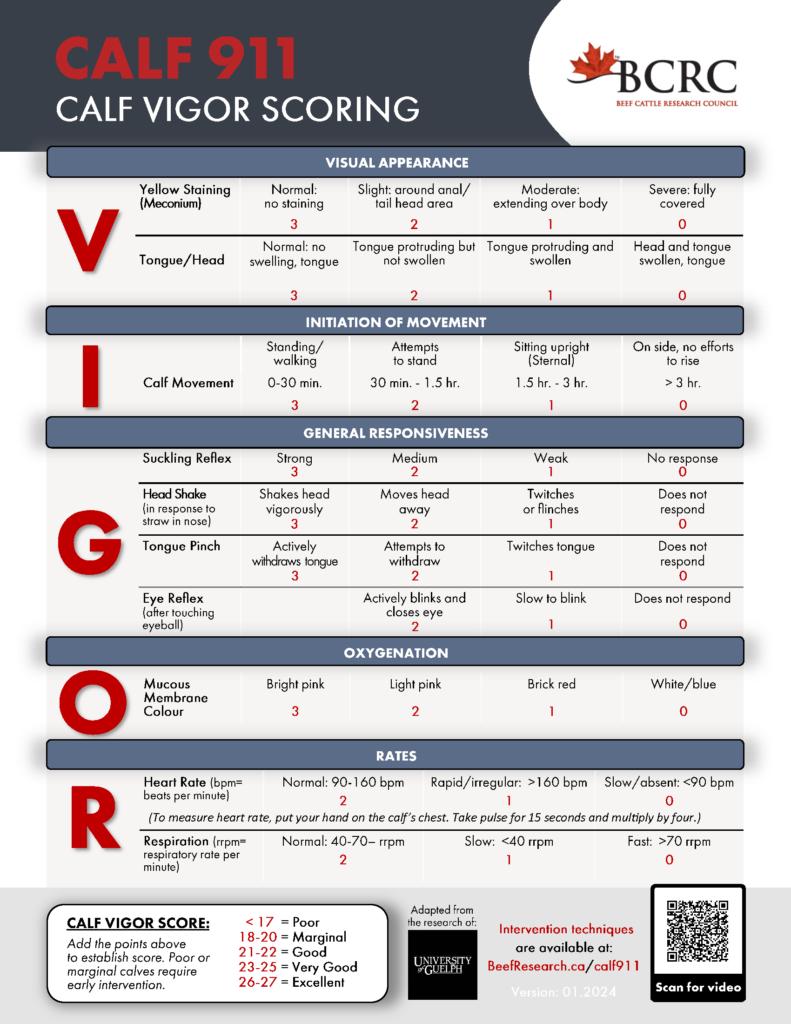
The calf VIGOR scoring system is a standardized exam that was developed to help producers evaluate newborn calves and determine whether early intervention measures are necessary.
In the following video, Christine Murray-Kerr, PhD, from the University of Guelph walks producers through each step of the exam in the following video.
Video: How to assess newborn calf vigor
VIGOR is an Acronym for the Five Objective Measurements of Calf Vitality:
V – Visual Appearance: Yellow meconium staining on a calf as well as swelling in the head and face can indicate a prolonged birth. (0:50)
I – Initiation of Movement: The ability of a calf to get up and move will predict its ability to mother up and receive adequate colostrum. (1:27)
G – General Responsiveness: Reflexes such as suckling, head shake, tongue withdrawal and eye reflex reflect a calf’s vigor. (1:50)
O – Oxygenation: The mucous membrane or gum color is a good indication of how a calf is receiving and using oxygen. (2:35)
R – Respiratory and Heart Rates: Both the heart and lung performance can be easily assessed by counting the heartbeat and the breaths taken in 15 seconds, and then multiplying by 4. (3:00)
A calf vigor score of below 20 would indicate an immediate need to intervene to ensure that a calf gets adequate:
close monitoring for any other conditions common to newborns.
Knowing the VIGOR score of each new calf will help to determine if, and what, early intervention strategies should be used to give the calf the best chance of survival and good productivity through to weaning.
Calves born unassisted and uncompromised will typically stand and nurse from their mothers within one to two hours after birth. However, calves that experience a difficult or prolonged birth, have a swollen tongue, experience hypothermia or are a twin may be less vigorous and unable to stand and nurse during that critical period. A cow with a large udder, poor udder suspension and/or large teats may also limit a calf’s ability to receive adequate colostrum.
It is crucial for producers to observe newborn calves to make sure they have received colostrum and to intervene if necessary. Look closely to see if any of the cow’s teats have been suckled, feel if the calf’s belly is full and check the hooves to see if the rubbery capsule has been worn off to indicate standing. Checking a calf’s suckle reflex by sticking your fingers in the calf’s mouth is also a simple indicator to demonstrate whether the suckle reflex is weak and the calf needs to be supplemented with colostrum.
Video: How to handle colostrum so newborn calves thrive
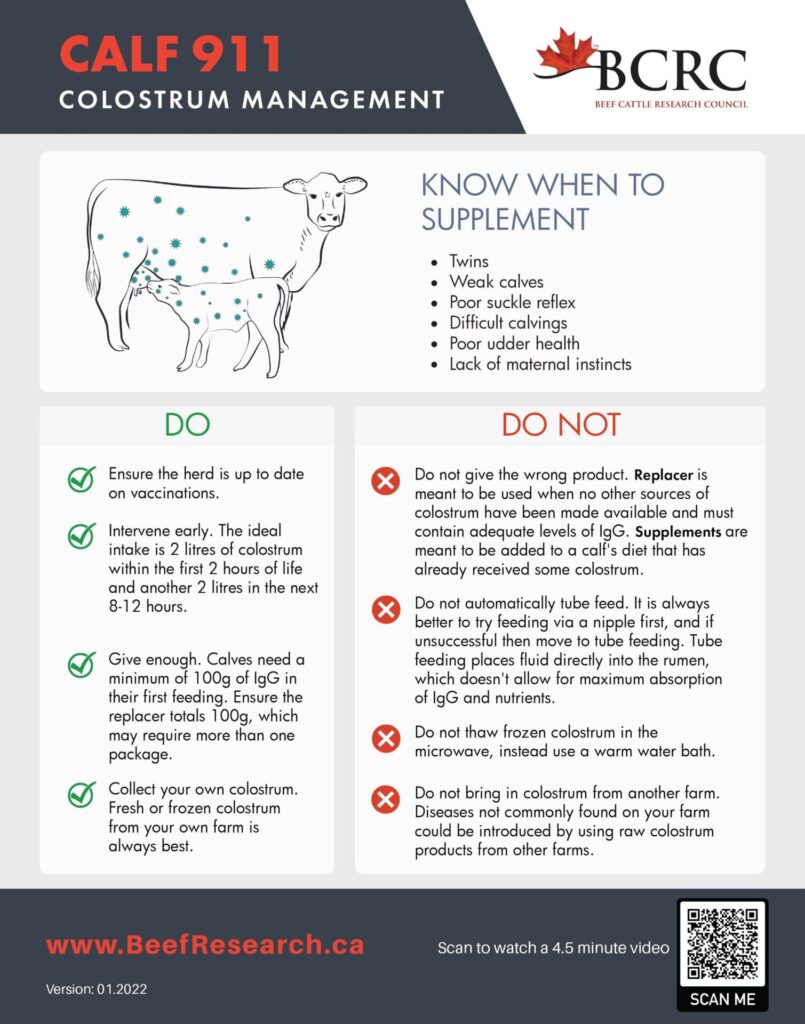
Considerations when feeding a calf colostrum:
Early intervention is key. Antibody absorption drops after six hours following birth, and by hour 12, the gut capacity to absorb antibodies drops by half. After 24 hours, the calf’s gut will be “closed” and no longer allows passing of antibodies through the gut lining.
Beef calves should receive at least two litres (or 8.5 cups; 0.5 gallons) of colostrum within the first two hours of being born. If feeding colostrum, ensure it is warmed to 38°C (100°F).
Some colostrum is better than none. If you think a calf has not received colostrum and you are within the 24-hour window, provide it. After 24 hours, any colostrum that is fed will not be absorbed and is a waste of good quality IgG.
Always attempt feeding colostrum by bottle first, which allows colostrum to enter the abomasum where antibody absorption is maximized. In contrast, tube feeding first places colostrum in the rumen, where antibody absorption is limited, and colostrum only reaches the abomasum once the rumen overflows.
The BEST SOURCE OF COLOSTRUM is from your own herd. Colostrum can be milked from the newly calved cow or collected from another cow on-farm and frozen and stored for up to one year. This ensures the colostrum received provides immunity to the calf from diseases that are specific to that farm and the calf’s environment while maintaining a closed herd.
DON’T feed calves colostrum from other farms because of the risk of disease transmission like E. coli, Salmonella spp., Mycoplasma bovis and MAP (Mycobacterium avium paratuberculosis, the precursor to Johne’s disease).
Store by freezing colostrum in a large Ziplock bag, laying it flat. Be sure to label the bags and use within a year of storage.
NEVER thaw colostrum in the microwave because this will destroy antibodies. Instead, place the frozen Ziplock bag in a bucket of warm water and allow to thaw and warm slowly.
Colostrum replacer or supplement products are sufficient if other options are not available but remember that products labeled as a “Colostrum Supplement” DO NOT provide calves with enough antibodies to be relied on alone. “Supplement” products may provide a boost to calves who have had SOME colostrum but need more energy, fat and protein supplement with a little bit of IgG. For calves that have had no other colostrum, use a product labeled as “Colostrum Replacement.” Regardless of the source, colostrum should contain a minimum of 100g IgG up to 300g IgG. Very few colostrum replacer products provide 100g, so read the label carefully.
DON’T feed beef calves colostrum from dairy animals, as antibody concentration in dairy colostrum is typically lower than in beef colostrum.
Properly managing colostrum on your operation can minimize the risk of disease and death and increase growth in pre-weaned calves. Ensuring each calf has received adequate colostrum will provide calves with the best start to a healthy and productive life.
While the goal is to always have vigorous calves that nurse right away, and maternal cows that bring them up right, illness and suckling issues can be a reality. Esophageal feeding, also known as “tube feeding” or “stomach feeding,” is essential when a calf requires colostrum or if you are treating dehydration in a sick calf. Knowing how to properly tube feed a calf is critical to help support calves when they are at their most vulnerable.
Video: How to tube feed a newborn calf
Here are a few tips to consider while tube feeding calves:
Always have two esophageal feeders: one designated for sick calves and the other for feeding colostrum to healthy calves. This will prevent disease and pathogen transmission from sick to healthy calves.
Prevent aspiration (fluid in the lungs) with proper positioning. The calf can be standing, sitting or lying down with the head in a neutral position above the stomach.
Open the mouth and pass the empty tube over the tongue to the back of the mouth. Allow the calf to swallow the tube so that it easily passes into the esophagus.
NEVER force the tube down. If there is resistance, pull the tube out and try again.
Once the tube is placed, you should be able to easily palpate both the rigid, enlarged esophagus and the rings of the trachea (windpipe). If both cannot be felt, you do not have proper positioning. Remove the tube and start again.
Liquid being fed should always be at body temperature or 38°C (100°F) to prevent shock in an already weak calf.
Allow the feeder to empty slowly. This can take upwards of three minutes. Slow feeding will reduce the risk of regurgitation, preventing aspiration into the lungs.
Clip or kink the tube after feeding to prevent excess fluids from draining as the tube is being pulled out. Not doing this could result in aspiration (fluid in the lungs).
Clean and sanitize the tube and feeding apparatus after every feeding.
It can be stressful when a calf needs to be tube fed. However, understanding proper technique and the physiology behind it can not only save lives, but also will improve the overall health of your herd.
Disease Prevention in Young Calves
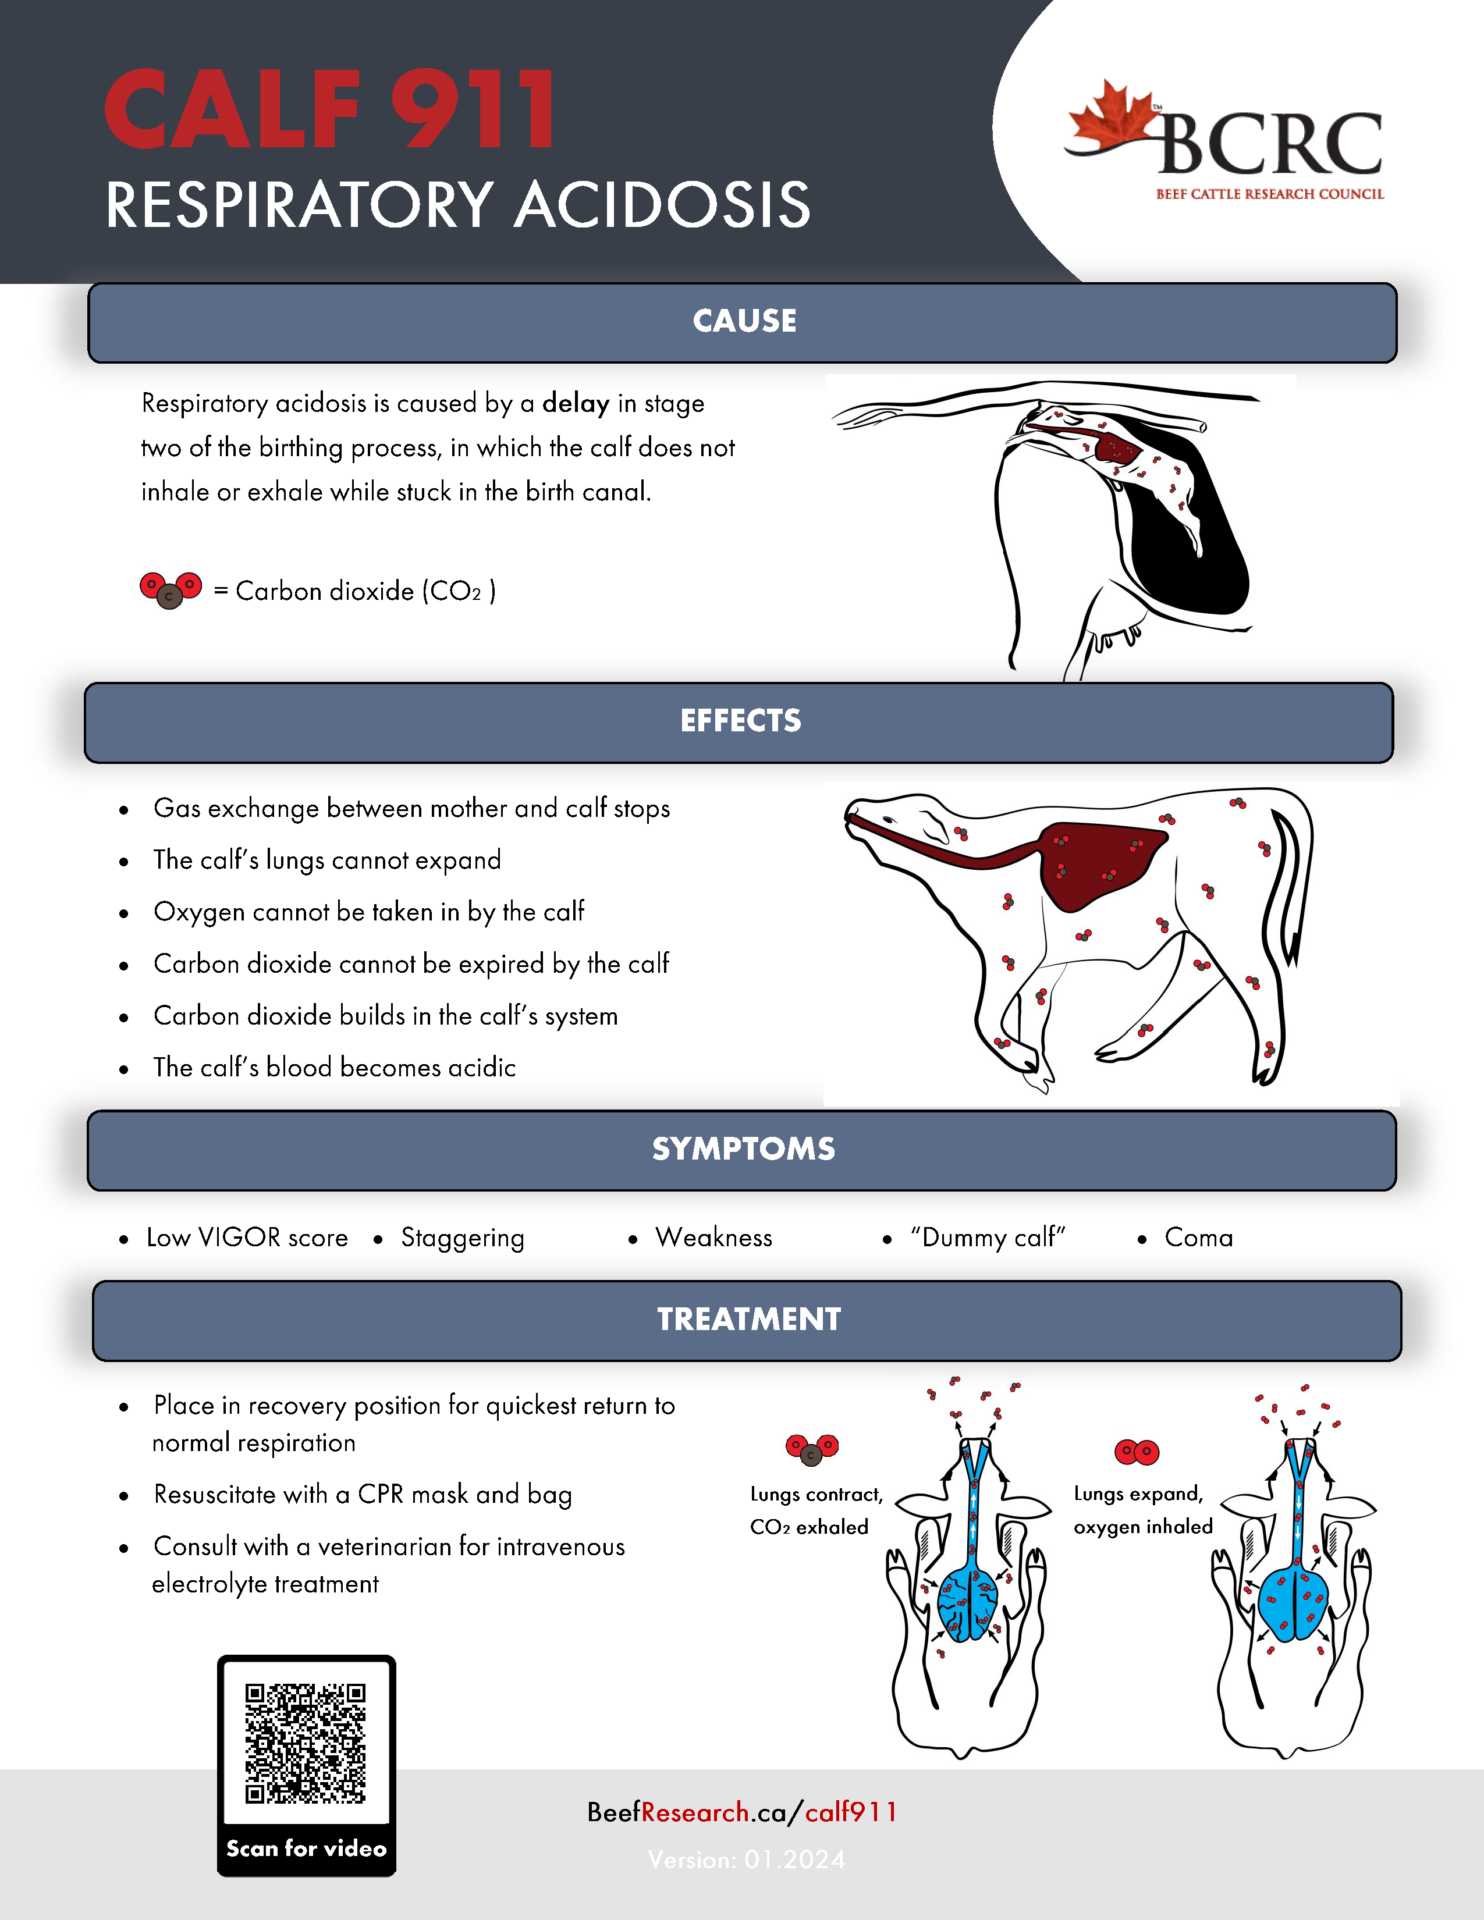
Respiratory Acidosis
Most beef producers know the frustration that accompanies dealing with the dreaded “dummy calf”. These calves will not suckle, won’t sit up or stand and stare blankly with what seems to be a lack of will and intelligence to survive despite your best efforts. This lack of coordinated movement is often due to respiratory acidosis.
In the following video, Dr. Gabriel Jantzi of Metzger Veterinary Services explains the mechanisms that are involved in causing this type of acidosis, how to prevent it and steps to take when it does occur.
Video: How to spot respiratory acidosis
What Causes Respiratory Acidosis?
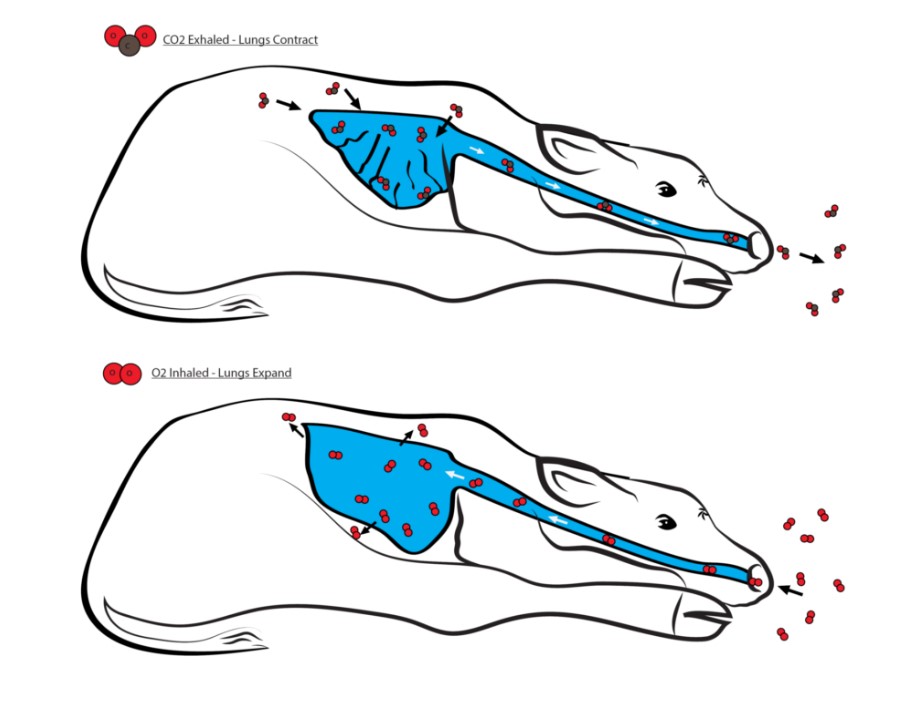
THE NORMAL RESPIRATION PROCESS
During a normal birth, the momentary respiratory acidosis acts as a trigger to cause the calf to gasp for air after delivery.
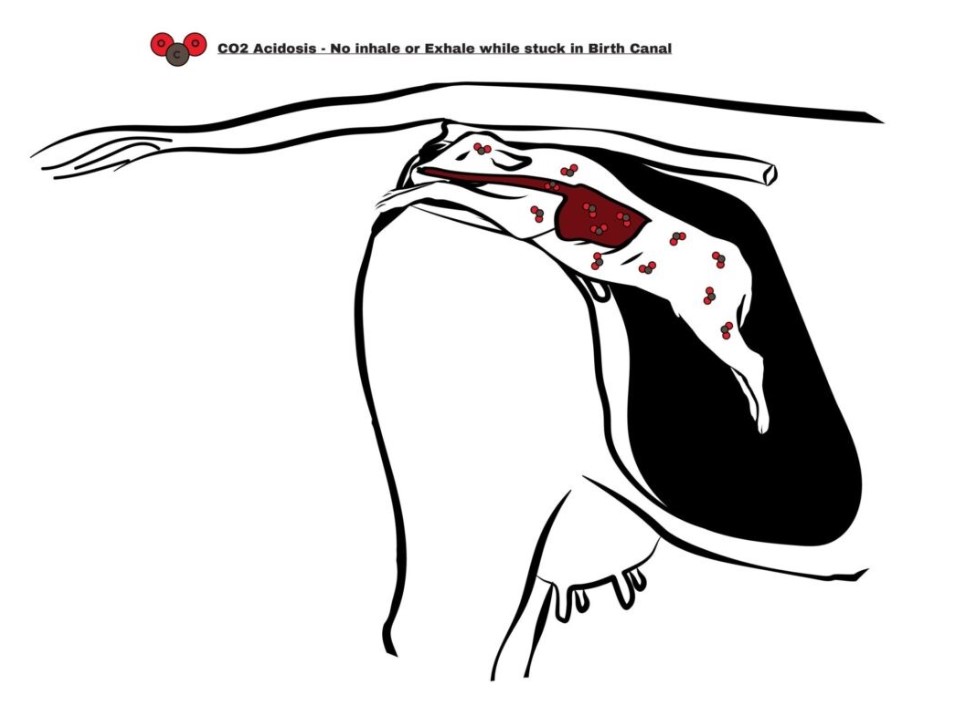
When a calf is in utero, the placenta is attached to both the mother and the calf. This link allows the mother to pass oxygen to the fetus and take away carbon dioxide, which is the waste product of breathing. Once the second stage of labor is initiated, the calf begins its journey to the outside world. During this period, the calf’s respiration is neither supported by the dam, nor able to breathe on its own. At this point, the calf is still processing the oxygen it had in its system, creating carbon dioxide, but it lacks a way of expelling it from its body. This carbon dioxide builds up in the blood, making it acidic.
When the birthing process proceeds as it should, this momentary respiratory acidosis can act as a trigger to cause the calf to gasp for air after delivery. This initiation of breathing allows for the built-up carbon dioxide to be exhaled, and the body can correct the acidosis via normal respiration.
When the normal birthing process is delayed, carbon dioxide builds up in the calf’s body resulting in a state of acidosis.
COMPLICATIONS IN NEWBORN CALVES
The problem occurs when the normal birthing process gets delayed. In this instance the calf is in a prolonged stage of being unable to clear the carbon dioxide from its body. This continues to create a state of acidosis, and the result is a “dummy calf”.
What are the symptoms of respiratory acidosis?
A calf known to have experienced delayed calving and that scores low on the calf VIGOR scoring system, is likely to suffer from respiratory acidosis. Symptoms of an acidotic calf can include:
Low VIGOR score
Poor suckle reflex
“Dummy calf” appearance or stupor
Weakness
Lack of coordination and or staggering
Coma
How do you treat respiratory acidosis?
The best treatment for respiratory acidosis is prevention. Good management practices help prevent calving difficulties and are key to minimizing the number of calves born with this challenging condition.
When calving difficulties do arise, early intervention is critical to ensure the calf initiates normal breathing as soon as possible. Proper resuscitation techniques are enough to prompt spontaneous respiration in those calves that are capable. However, for calves requiring more help, the use of a respiration aid such as an ambubag or mask respirator is necessary.
Once acidosis is established in the blood stream, electrolytes are needed to help correct blood pH levels. However, oral electrolytes provided using a stomach tube are not able to work quickly enough. A veterinarian will need to be contacted for advice on administering intravenous electrolytes as soon as possible.
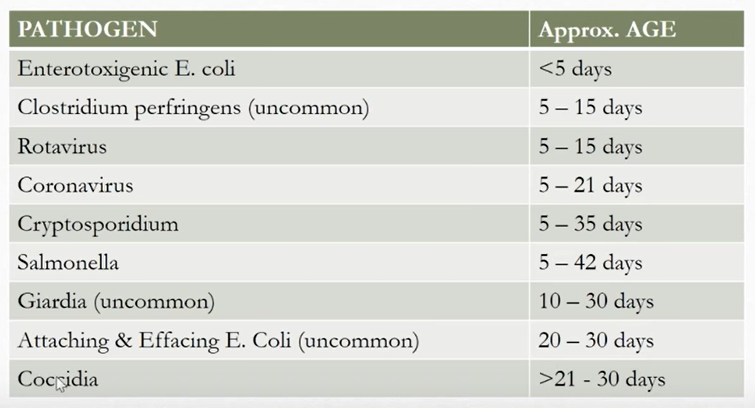
The average herd treated nearly 3% of calves for diarrhea before weaning, nearly all before one month of age. Treatment rates were much higher in some herds (e.g., over 8% treated before a month of age). Death losses averaged 0.5% but reached 2% in some herds.
Calf diarrhea (scours) is the primary cause of death in calves from two to 30 days of age. Scours can be caused by pathogens such as viruses, bacteria and microscopic parasites. Most of these pathogens do damage to the intestinal tract. Several mechanisms go to work there, all of which cause diarrhea or scours.
Rotavirus, coronavirus and cryptosporidium (crypto) can be carried by healthy heifers and cows and are shed into the environment in their manure. Cryptosporidium is particularly troublesome because no effective treatment nor vaccine is available despite extensive research.
Bacteria, such as certain strains of E. coli and Salmonella, invade the deeper layers of the intestinal lining, rapidly destroying it, with the infection causing release of blood and mucus into the diarrhea.
If cattle calve in the same area year after year, the soil can become contaminated with scour-causing pathogens. Newborn calves often pick up the pathogen from feces of other animals and from contaminated soil and water. While not all calves will become sick, their guts can serve as pathogen-multipliers. These calves shed an increasing load of pathogen onto the calving ground, then younger calves come along and pick up the heavy load of the bacteria. The dose-load of pathogens overwhelms the calf ’s ability to resist disease, and suddenly the beef producer is dealing with a bunch of sick calves.
It’s a great feeling when a calf arrives on the ground safe and sound. Ideally, things go well, and cows and newborn calves thrive. However, it’s important for producers to take the time to look for signs of early illness in neonatal calves. Being able to recognize the symptoms of disease and dehydration in baby calves is a simple and effective practice that can make a big mark on your bottom line.
Calves with scours are at a high risk for dehydration and hypothermia. When calves infected with neonatal scours die, it is ultimately because of dehydration, not the pathogens that cause the disease. Having practices in place on your operation to identify, manage and rehydrate calves suffering from scours or other causes of dehydration can increase the chance of recovery and optimize the health and wellbeing of young calves.
Video: How to spot dehydration in young calves
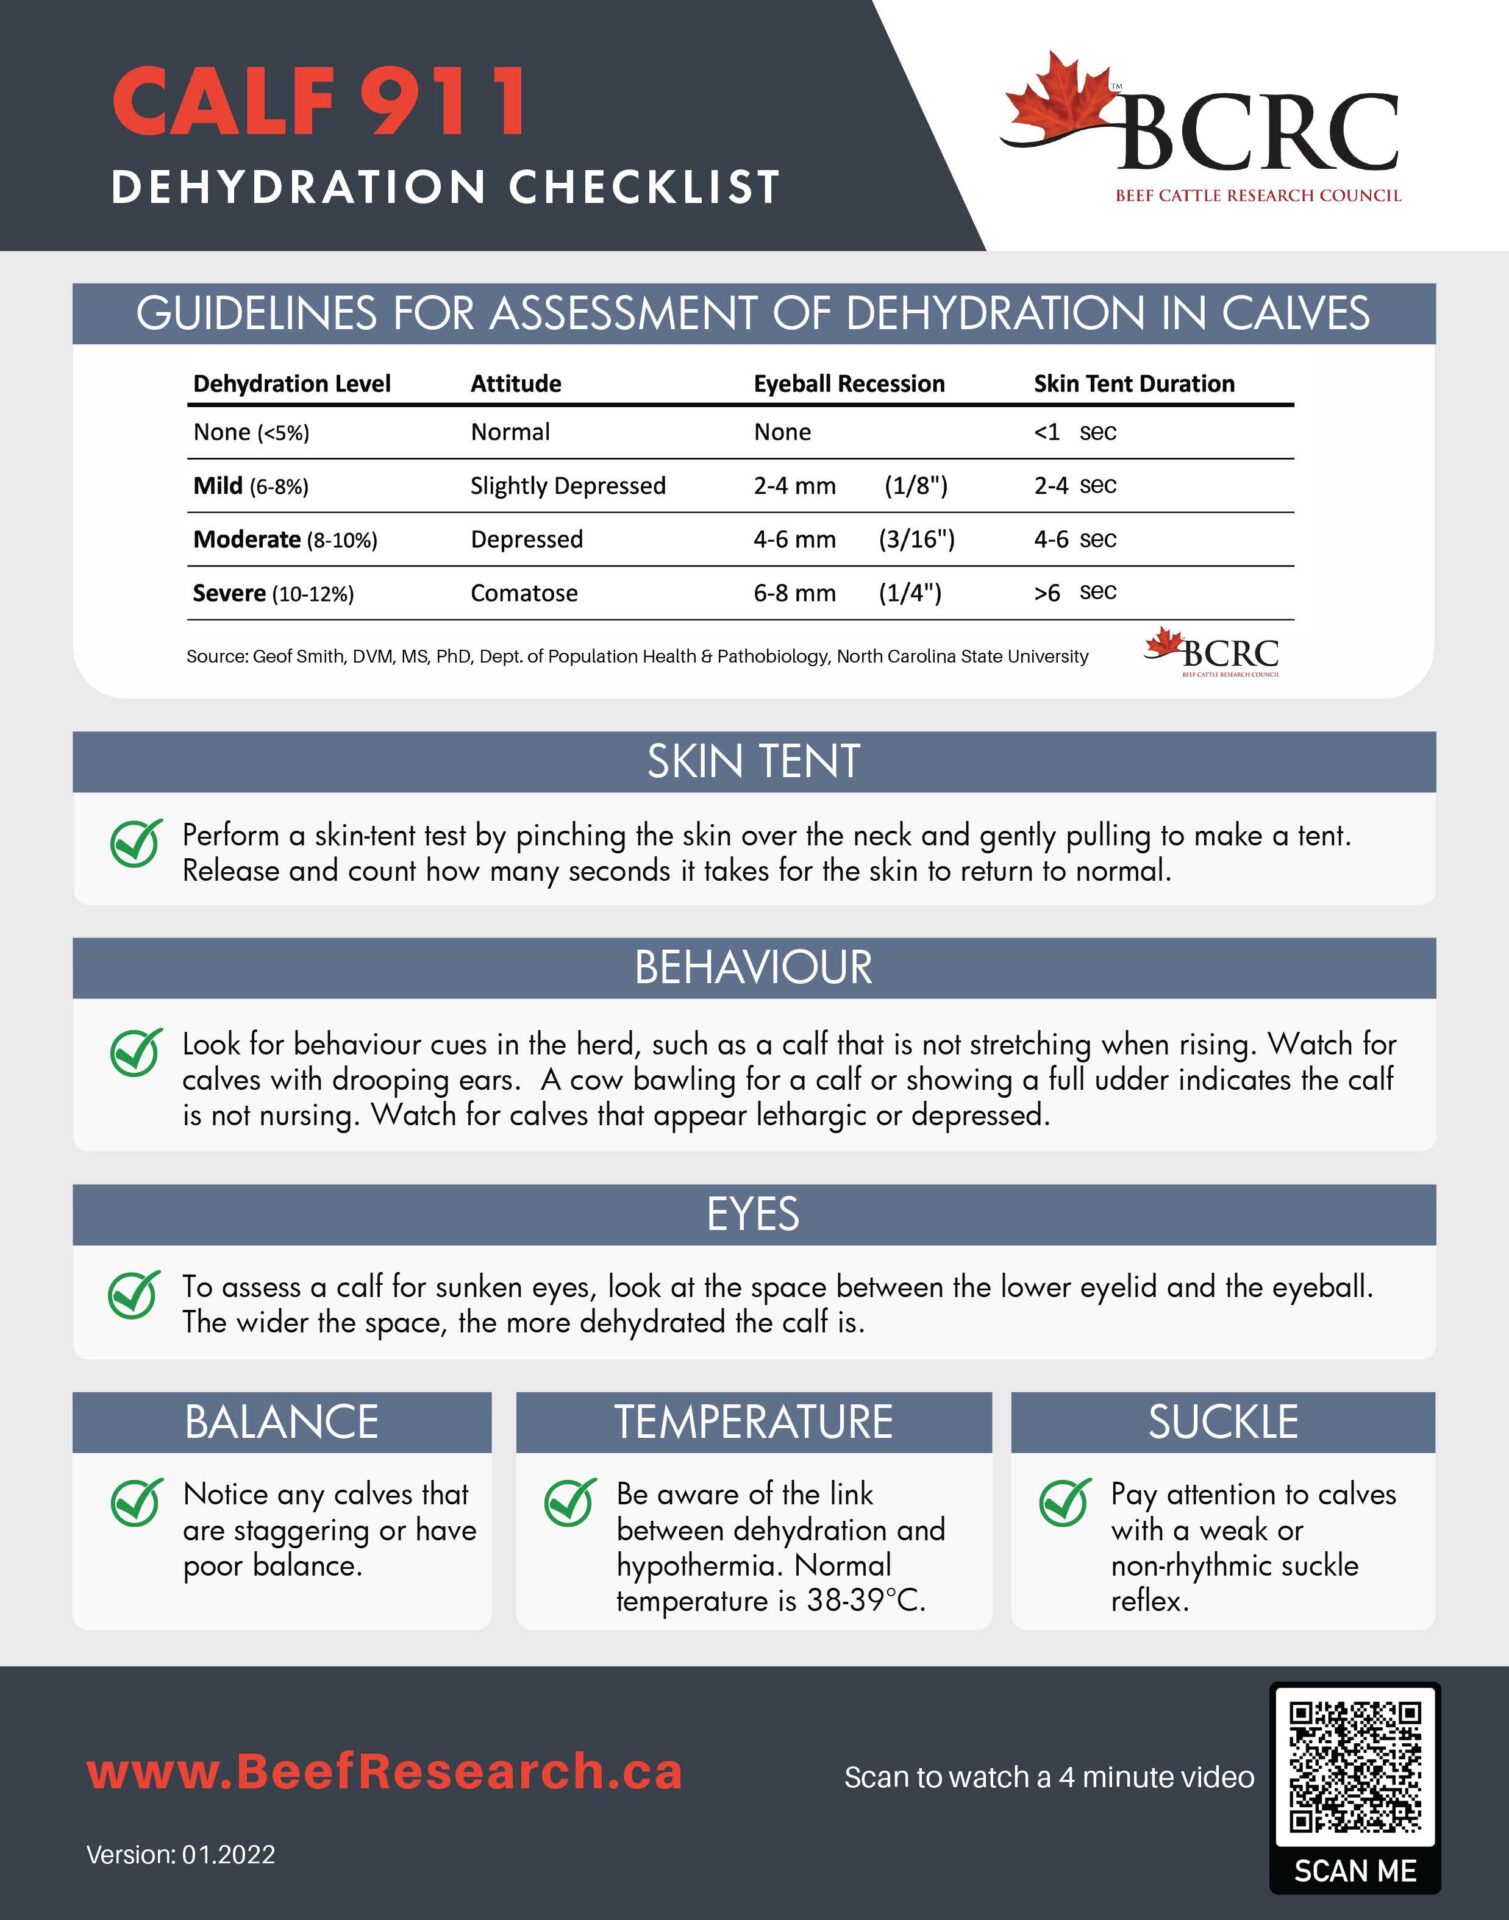
Here are some steps producers can use to evaluate the dehydration and health status of young calves:
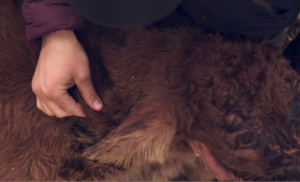
The skin-tent test may be used to evaluate dehydration. The skin will return to normal in two seconds in healthy calves. Anything longer is a sign that the calf is dehydrated and should be treated with electrolytes.
Perform a skin-tent test by pinching the skin over the neck and pulling gently to make a tent, then count how many seconds it takes for the skin to return to normal.
Look for behavior cues in the herd, such as a calf that is not stretching when rising or a cow bawling for a calf or showing a full udder, indicating the calf is not nursing.
Watch for calves with drooping ears.
Be aware of the link between dehydration and hypothermia or cold exposure;
Look for sunken or recessed eyes.
Watch for depression or lethargy in calves.
Be on the lookout for calves that stagger or have poor balance.
Pay attention to calves with weak or unrhythmic suckle reflex.
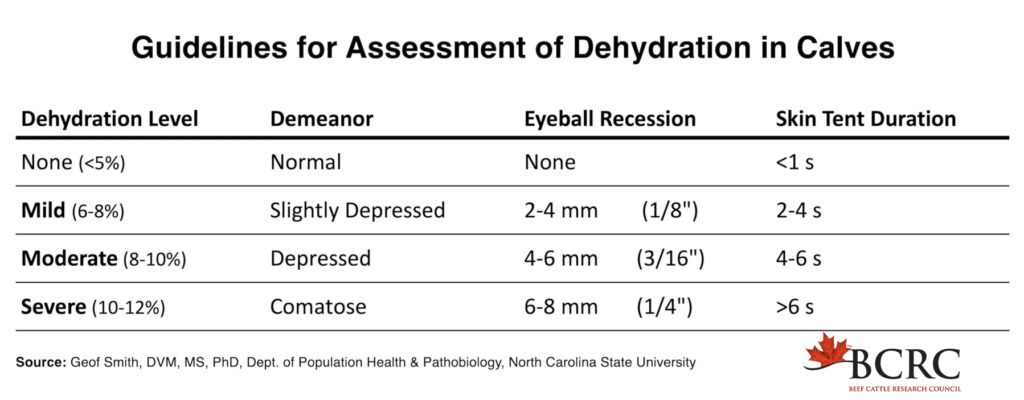
There are three degrees of dehydration: mild, moderate and severe. In some cases, dehydration, electrolyte imbalance and acidosis may be occurring at once.
The treatment for a dehydrated calf will depend on the severity of dehydration and other variables. Typically, this will be done with oral fluids and an electrolyte solution. Severe cases may call for intravenous (IV) fluids and potentially sodium bicarbonate (delivered through IV or orally depending on the severity of acidosis). Fluids should be given continuously until scouring stops. Even for healthy-looking calves, there is still a risk for dehydration if diarrhea persists.
According to veterinarian Elizabeth Homerosky, DVM, of Veterinary Agri-Health Services Ltd. in Rocky View County, Alberta, there are many things to consider while evaluating dehydration. Having the ability to accurately classify the level of dehydration is key to communicating with your veterinarian and developing a successful treatment plan:
Early intervention is key!
An in-field test called the “skin tent” can be used to evaluate dehydration. In healthy calves, the skin will return to normal in two seconds. Anything longer is a sign that the calf is dehydrated and should be treated with electrolytes.
A calf will appear normal until they are about 6% dehydrated.
When calves are mildly dehydrated, symptoms such as sunken eyes and a skin-tent test of two to four seconds will occur. These calves will still have a suckle reflex, which can be tested by placing two fingers in a calf’s mouth to see if they will suck. Mild dehydration can be treated with oral fluids such as an electrolyte solution and have a high likelihood of a full recovery.
Calves coping with moderate dehydration will spend a lot of time lying down, will not stretch when forced to rise, have a prolonged skin tent test (four to six seconds) and sunken eyes. These calves need to have oral fluids frequently throughout the day, until all symptoms are resolved, and need to be monitored closely.
Calves with severe dehydration will have a skin-tent test that lasts six or more seconds. These calves will be unable to stand, have extremely sunken eyes and will require IV fluidswith the help of a veterinarian. These calves, if they recover, will be more likely to have health problems such as pneumonia, reoccurring scours and other problems in the future.
Most electrolyte solutions are designed to replace the electrolytes that are rapidly leaving the calf’s body due to diarrhea. Be sure to select a product that contains sodium chloride or salt (NaCl), Potassium (K), an energy source like glucose and amino acids like glycine or alanine. Other ingredients may include acetate or propionate to help the calf retain sodium and water, correct electrolyte imbalances and potentially prevent acidosis. Work with your veterinarian to choose an electrolyte product that will work for you.
It is important to alternate feeding fluids and milk throughout the day because electrolyte powders don’t provide the energy that milk does. Milk can come from the dam or from a milk replacer product.
Always keep separate bottles and tube feeders for scouring calves and healthy calves requiring colostrum. Be sure to clean and disinfect all feeding equipment after each use.
Dehydrated calves have decreased blood volume and flow, which limits oxygen’s ability to circulate through the body and makes them very susceptible to hypothermia. Monitor this by taking the rectal temperature frequently and provide an alternate source of heat (i.e., hot box and warm fluids) if they are unable to maintain adequate body temperature.
35-38°C(95-100.4°F) is borderline hypothermia, and anything below 35°C (95°F) is considered severe hypothermia. Severe hypothermia WILL NOT be remedied by placing the calf in a hot box alone; you must gradually warm them from the inside out through feeding warm fluids. When dealing with severe cases, it is important to involve your veterinarian.
Any time you are dealing with a scours outbreak, it is important to be in contact with your veterinarian. They are the best source of information on specific treatments and how to prevent further incidence of disease through nutrition, strategic calving management, herd vaccination and other disease mitigation strategies.
Scours is a reality on farm and dehydration is a constant risk for calves suffering from it. Having the skills to quickly identify dehydration and knowing methods for early intervention can have a meaningful reduction in the rate of calf illness and death on your farm.
Metabolic Acidosis
Metabolic acidosis is a common finding in calves with diarrhea-induced dehydration and endotoxemia in the aftermath of gram-negative bacterial infections. Without treatment, metabolic acidosis is a prime factor in the death of many of these calves
Treatment of acidemia with alkalinizing solutions such as commercially available electrolytes is important for restoration of normal body function and suckle reflex. Metabolic acidosis in calves with and without dehydration can be predicted by:
inability to stand
ataxia
Slow or weak suckling force
Depression
Severe metabolic acidosis may require intravenous fluids to correct the acidemia, so symptoms and a treatment plan should be discussed with a veterinarian.
Septicemia
Septicemia is an inflammatory response to bacteria or bacterial toxins in the blood. This is often a secondary infection where a bacterial infection elsewhere gets into the bloodstream. There are two main times this occurs, including in young calves (less than two weeks old) that have failed transfer of passive immunity due to not enough colostrum, or when calves get exposed to bacteria, often through a naval infection that results in disease. This disease also often happens in scouring calves. In these calves, even though scours most likely isn’t bacterial, one of the symptoms is damage to the gut lining. In this case, bacteria that enter the calf’s stomach are more likely to cross through into the bloodstream. Clinical signs of septicemia include:
depression
fever or hypothermia
dullness
loss of appetite
red gums
visible blood vessels in the eyes
with progression, development of a weak pulse and cold extremities.
These symptoms are similar to those of calves with scours but calves with septicemia don’t always have diarrhea. If calves exhibit these symptoms but with no diarrhea, it’s a good indication that it is septicemia.
The condition progresses very rapidly, so early detection and treatment is key to catching calves in time for recovery. Even if calves are treated in time there is a high chance of developing other complications such as joint ill, pneumonia, or meningitis. Talk to your veterinarian about proper treatment, which could include intravenous antibiotics. Keeping calves warm and dry, hydrating them, providing energy, and possibly providing an NSAID is also very important in caring for septicemic calves.
Pneumonia
Pneumonia or bovine respiratory disease can be caused by a number of different viruses or bacteria. Clinical signs include:
cough
runny nose or eyes
“raspy” sound when breathing
increased breathing rate
fever
dullness
depression
decreased appetite
rough hair coat
There are two main times when pneumonia outbreaks occur pre-weaning. The first is in calves less than a month old. As is the case with septicemia, these calves often fail to receive enough colostrum resulting in a failed transfer of passive immunity. Some herds will also deal with a “summer pasture pneumonia” which occurs in calves 90-150 days old. This most likely occurs when calves are starting to experience a decline in the maternal antibodies they have received from colostrum but have not yet mounted an immune response through vaccination. Antibiotics are often effective at treating pneumonia, if bacterial, but talk to your veterinarian about what is right for your herd.
Grafting Calves
Often if producers lose a calf they may want to graft on an extra calf from a set of twins, a cow that won’t take a calf, or a cow that died. Calves that are grafted onto a cow should be from within the producer’s own herd. Introducing calves from other herds, even neighbouring beef herds, presents the risk of bringing in disease. Often the cost of these outbreaks is much more than the income lost by having a dry cow. Some options and tips for grafting calves include: Skin the dead calf and put that hide on the new calf: this encourages the cow to accept the new calf but may not be enough on its own and may need to be paired with some of the below methods. It is also time-consuming and physically difficult.
If the calf is dead at birth don’t let the cow smell it: if the cow hasn’t had a chance to bond with her calf, she may be more receptive to the new calf.
Rub birth fluids from the dead newborn calf on the new calf you are trying to graft.
Tie the new calf’s legs together when introducing it to the cow. This will allow the calf a chance to smell and lick the calf before it goes to her udder. It is recommended to do this under supervision to avoid getting the calf stepped on or injured.
Try to encourage the cow to lick the calf by putting some grain or molasses on the calf’s back.
Especially if the new calf has been tubed or bottle fed, it may be easier to put the cow in a head gate to keep her still while you teach the calf to suck from the cow’s udder.
Record Keeping
Calving records commonly include birth date (95%), calf identification (90%), and calving ease (74%). Aggressive behavior, udder conformation, and mis-mothering are rarely recorded, but are among the most frequent reasons for culling. Records are much more reliable than your memory, especially with large herds. More complete calving records will help you cull the right cows and select the right replacement heifers in fall.
Feedback
Feedback and questions on the content of this page are welcome. Please e-mail us at info@beefresearch.ca.
Acknowledgements
Thanks to Dr. Claire Windeyer from the Faculty of Veterinary Medicine at the University of Calgary for contributing her time and expertise in writing this page and Dr. Lisa Freeze for her expert review of the materials.
Expert Review
This content was last reviewed March 2024.
This topic was last revised on April 18, 2024 at 7:43 am.


